Onboarding
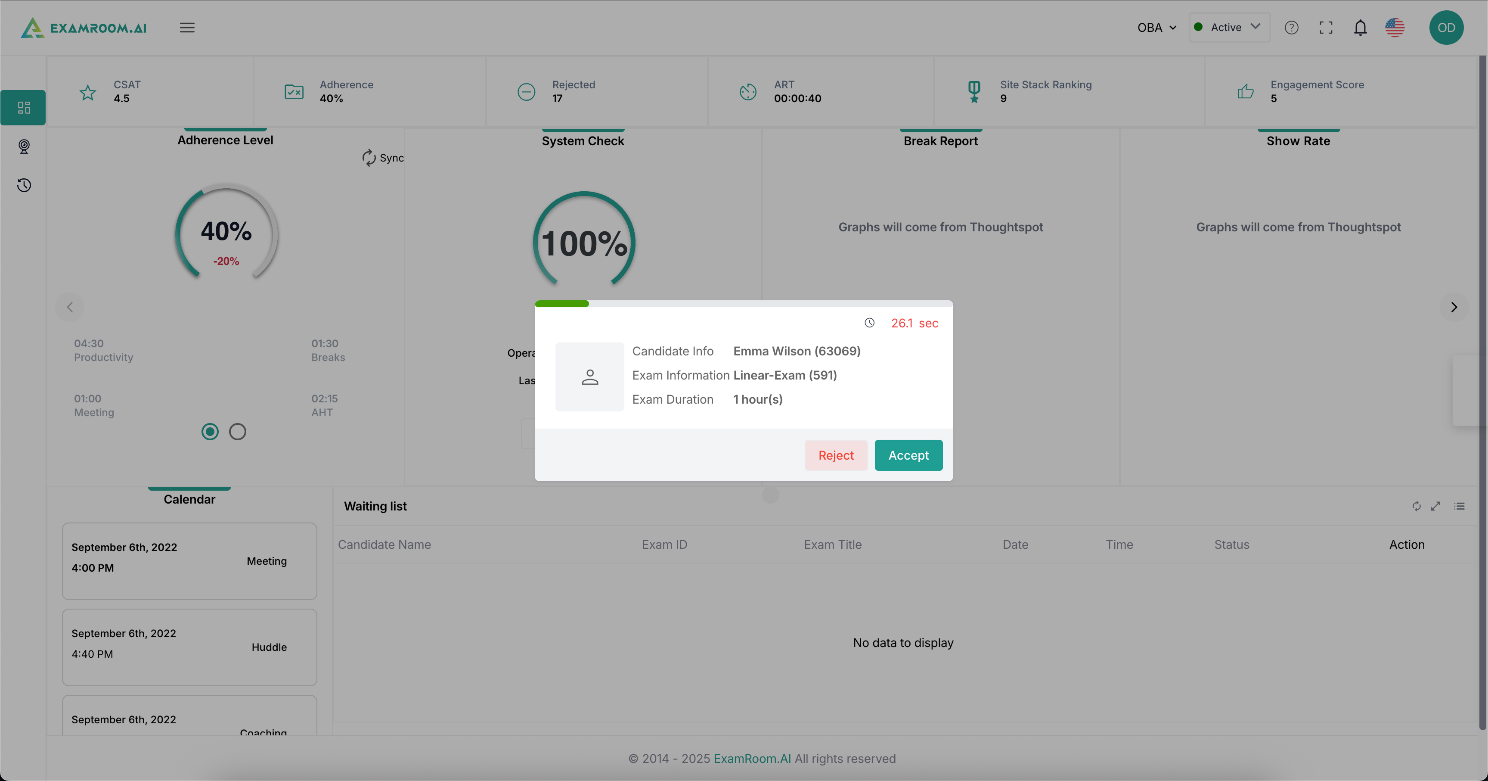
Note: Ensure to set the role to OBA and the status to active to proceed with onboarding and other OBA features.
- A pop-up appears mentioning the candidate and exam information. Click Accept to begin onboarding. Click Reject to reject the candidate.
- After accepting the candidate, you are redirected to the Onboarding screen on the left navigation menu, where the candidate’s live stream and verification criteria can be accessed.
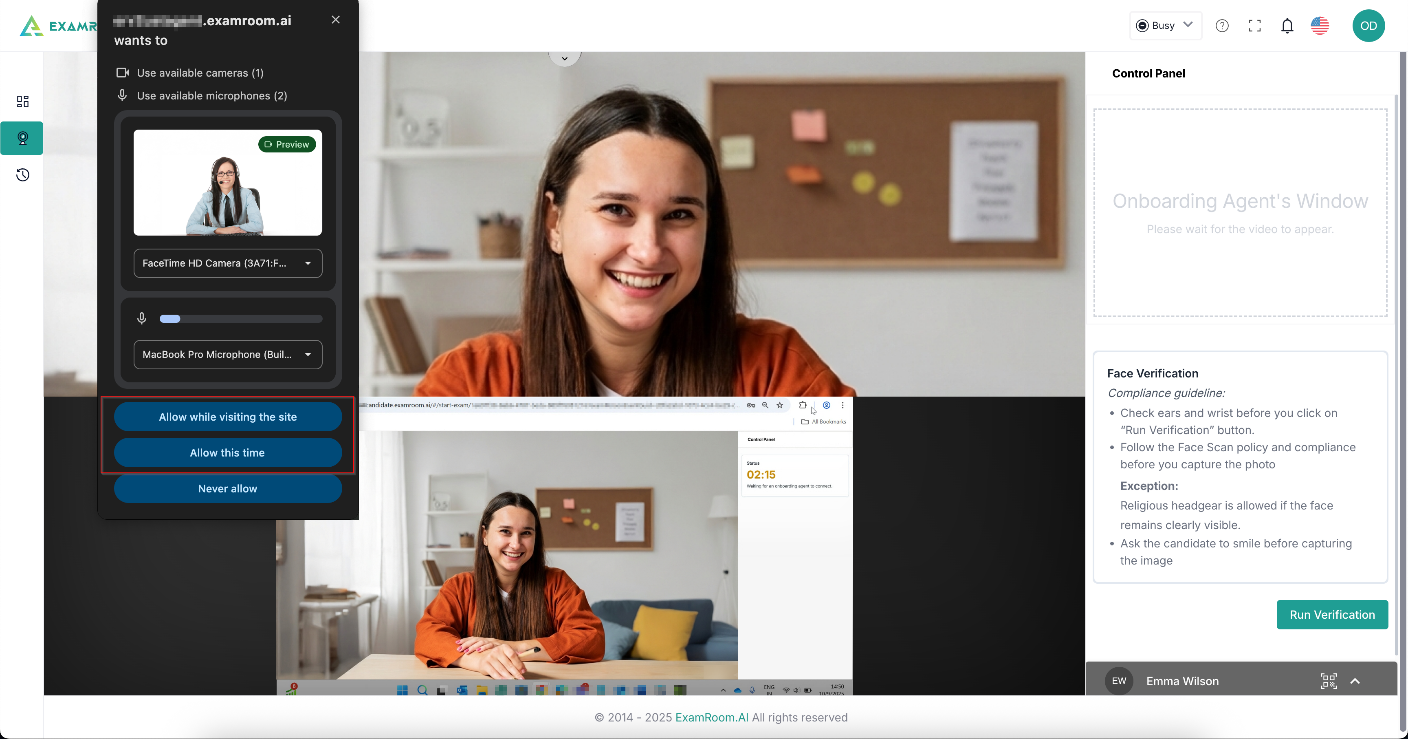
- The screen has a requisition for providing camera and microphone access. Click Allow to proceed.
Candidate’s Screen Preview Options
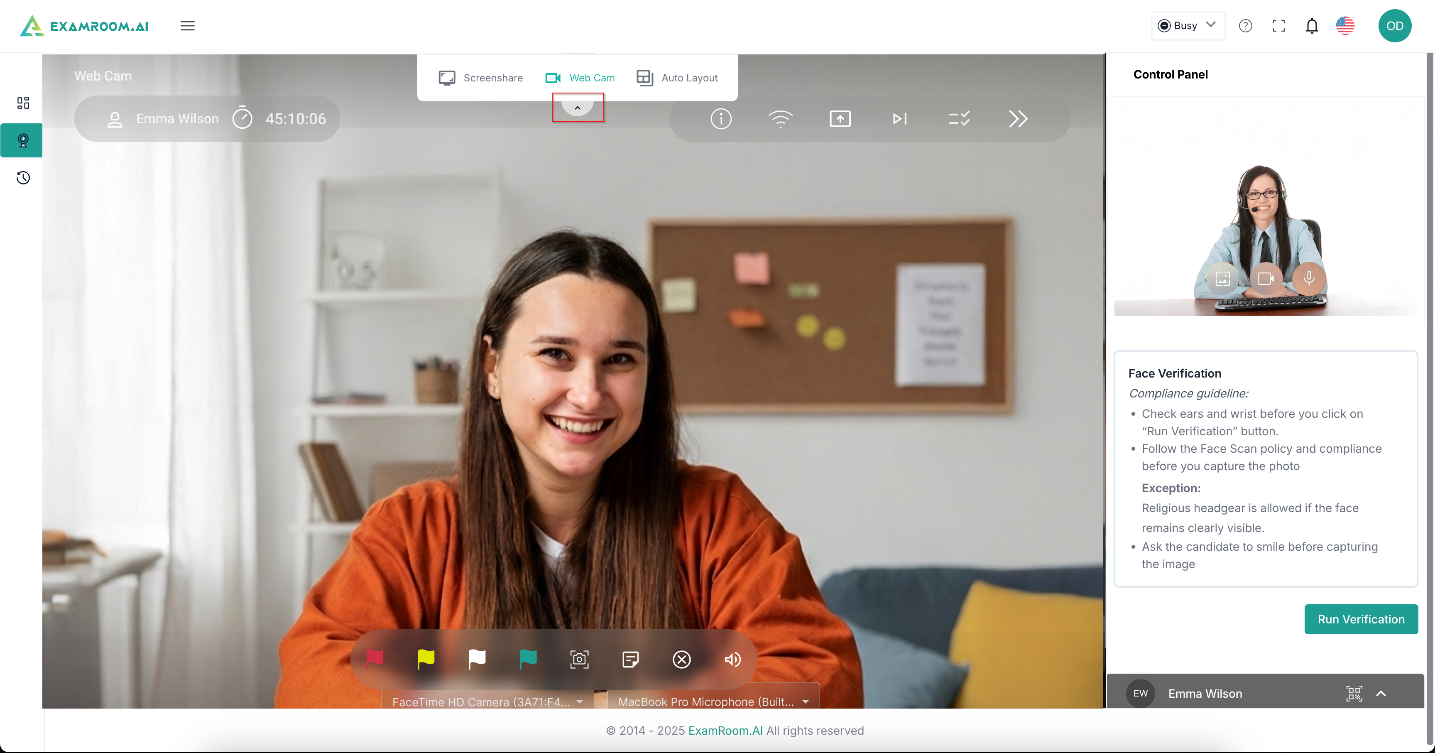
Click the Top Arrow button to open the drop-down to focus on the candidate screen, webcam, or auto-layout. For your understanding, we have selected the webcam view and explained the process.
Note: Double-click the candidate’s webcam preview area to switch between fit-to-screen and full-view modes.
Top Right Ribbon Options
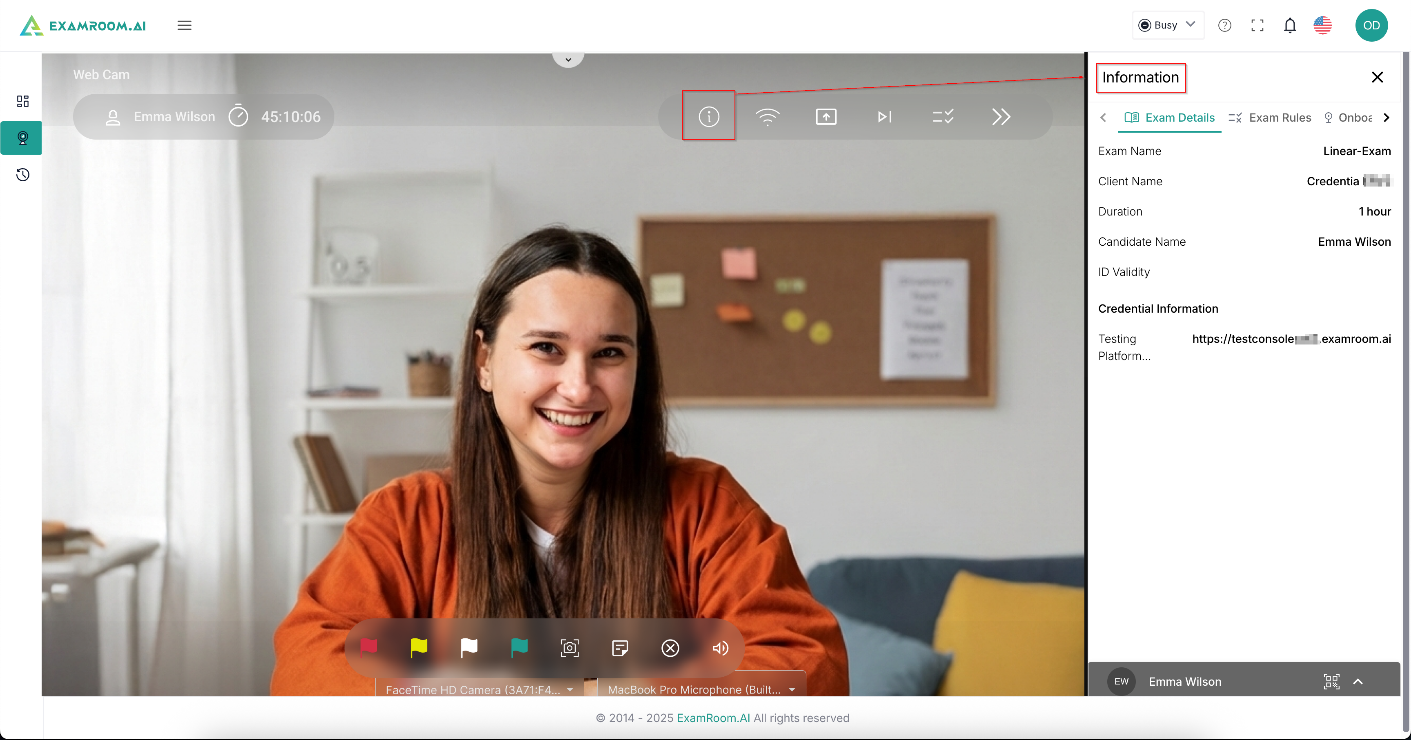
The following icons are available on the top panel on the right side:
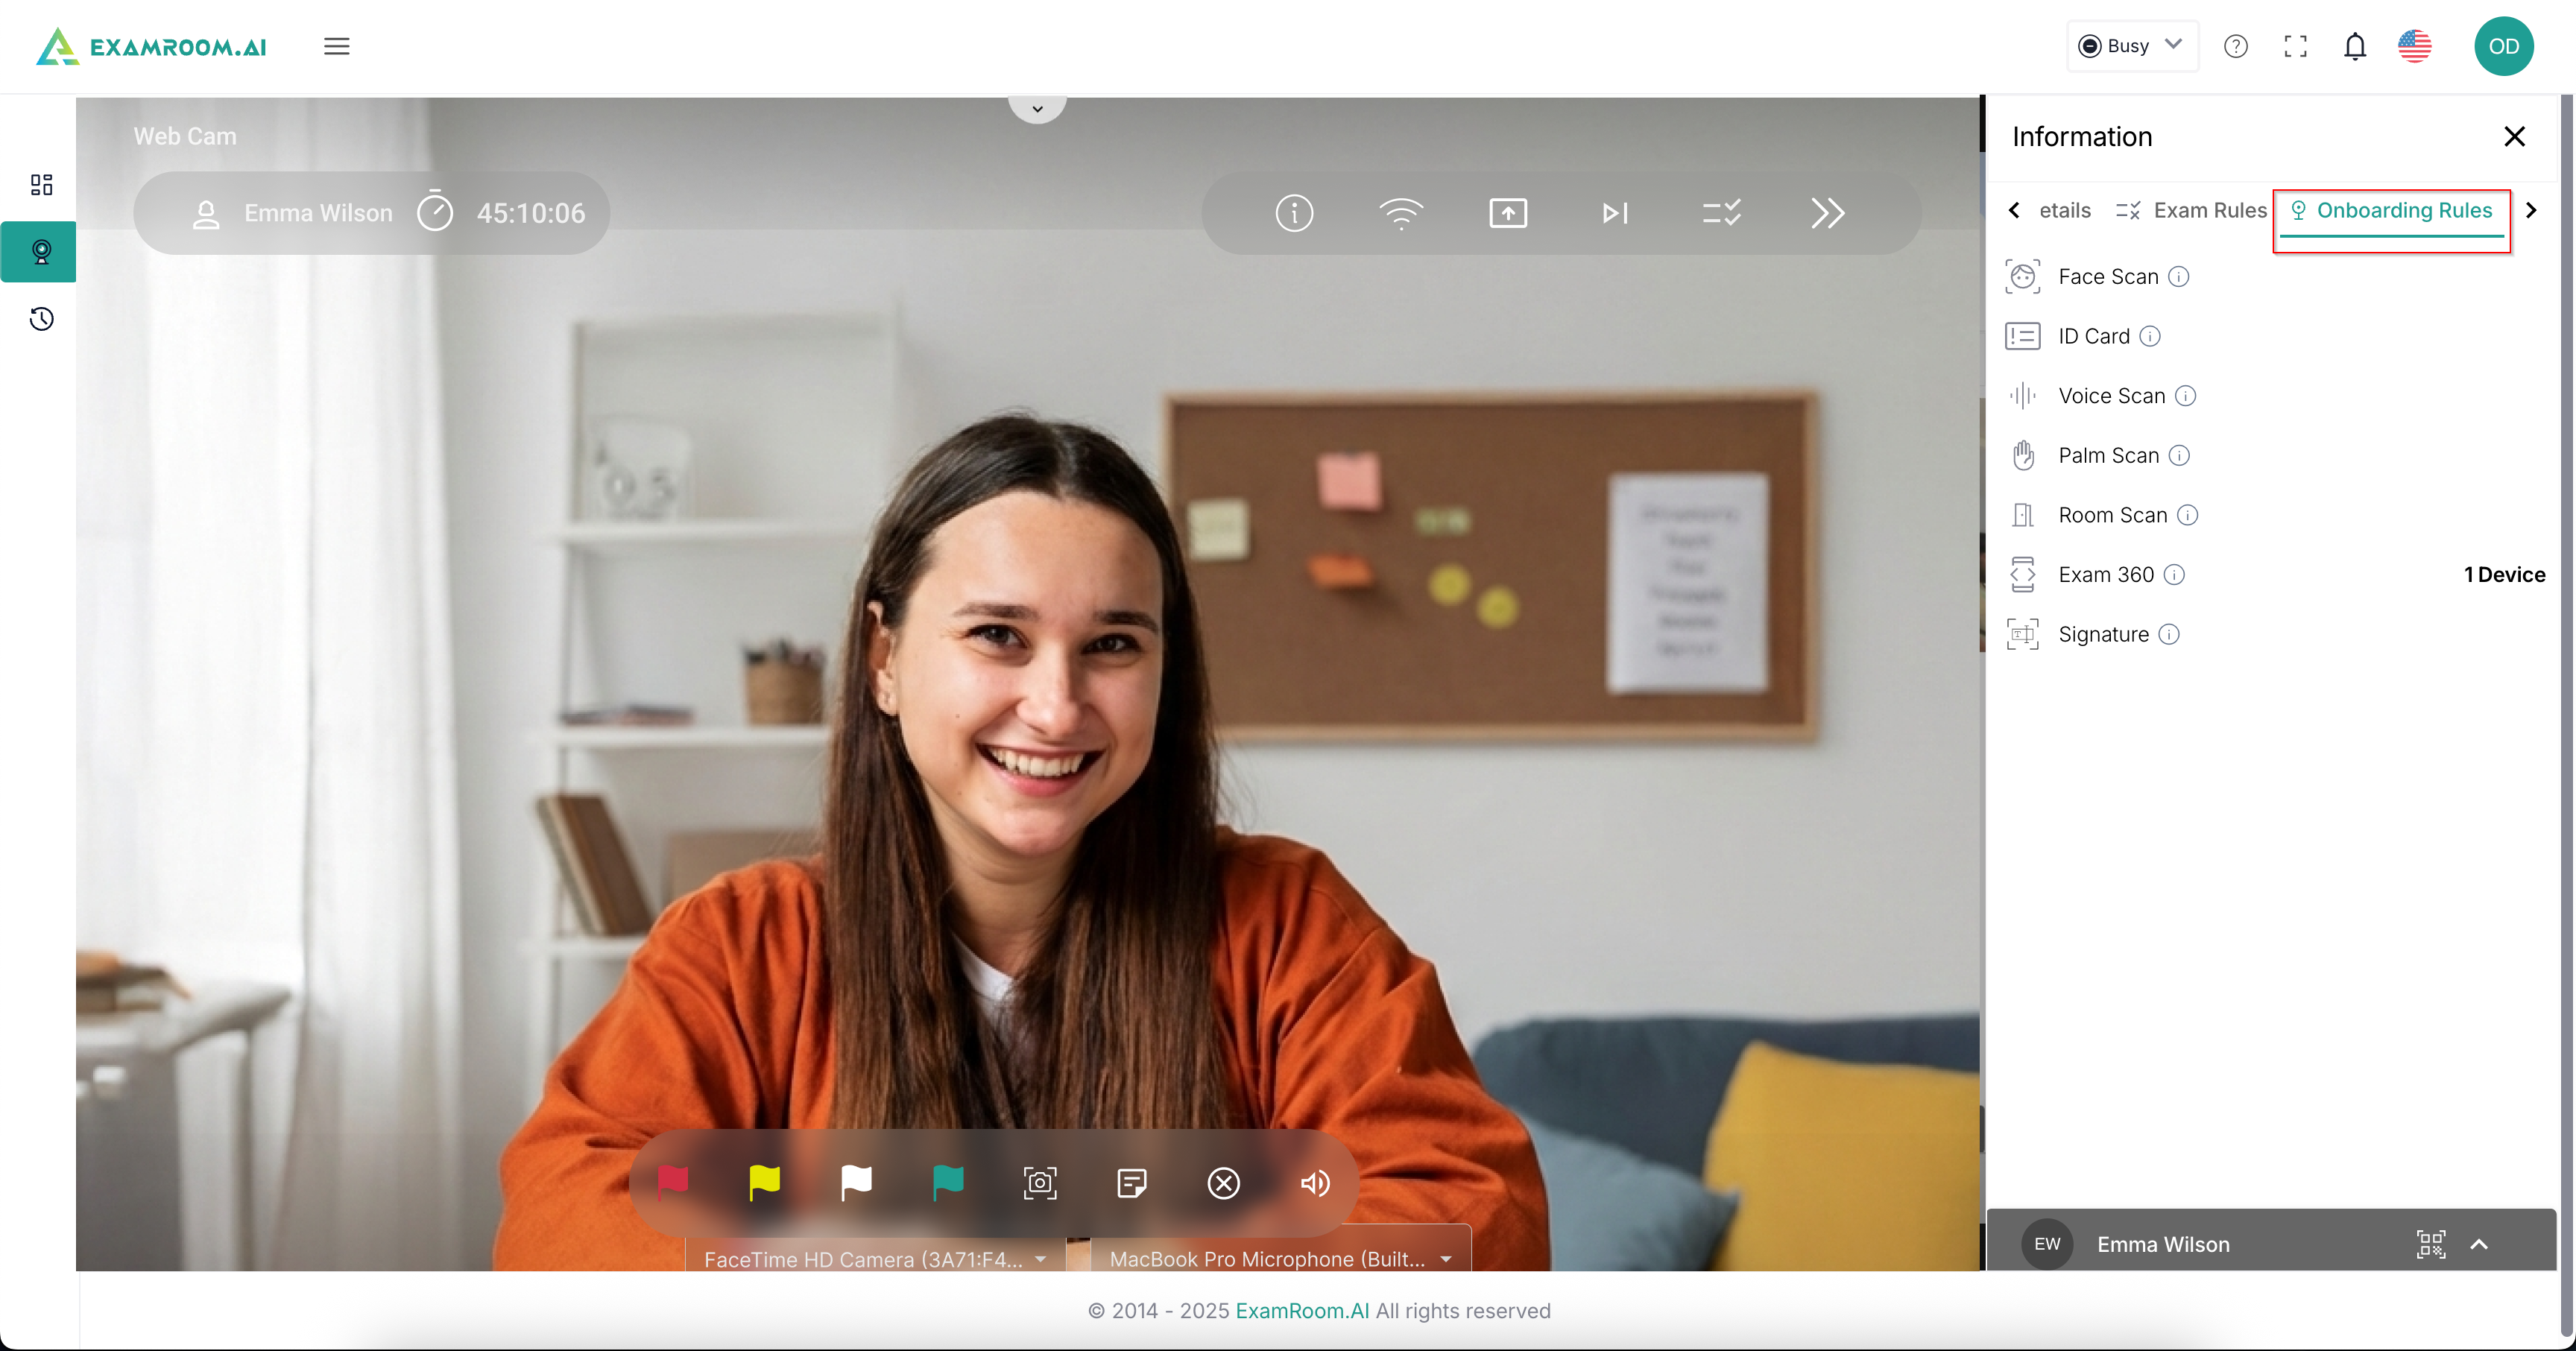
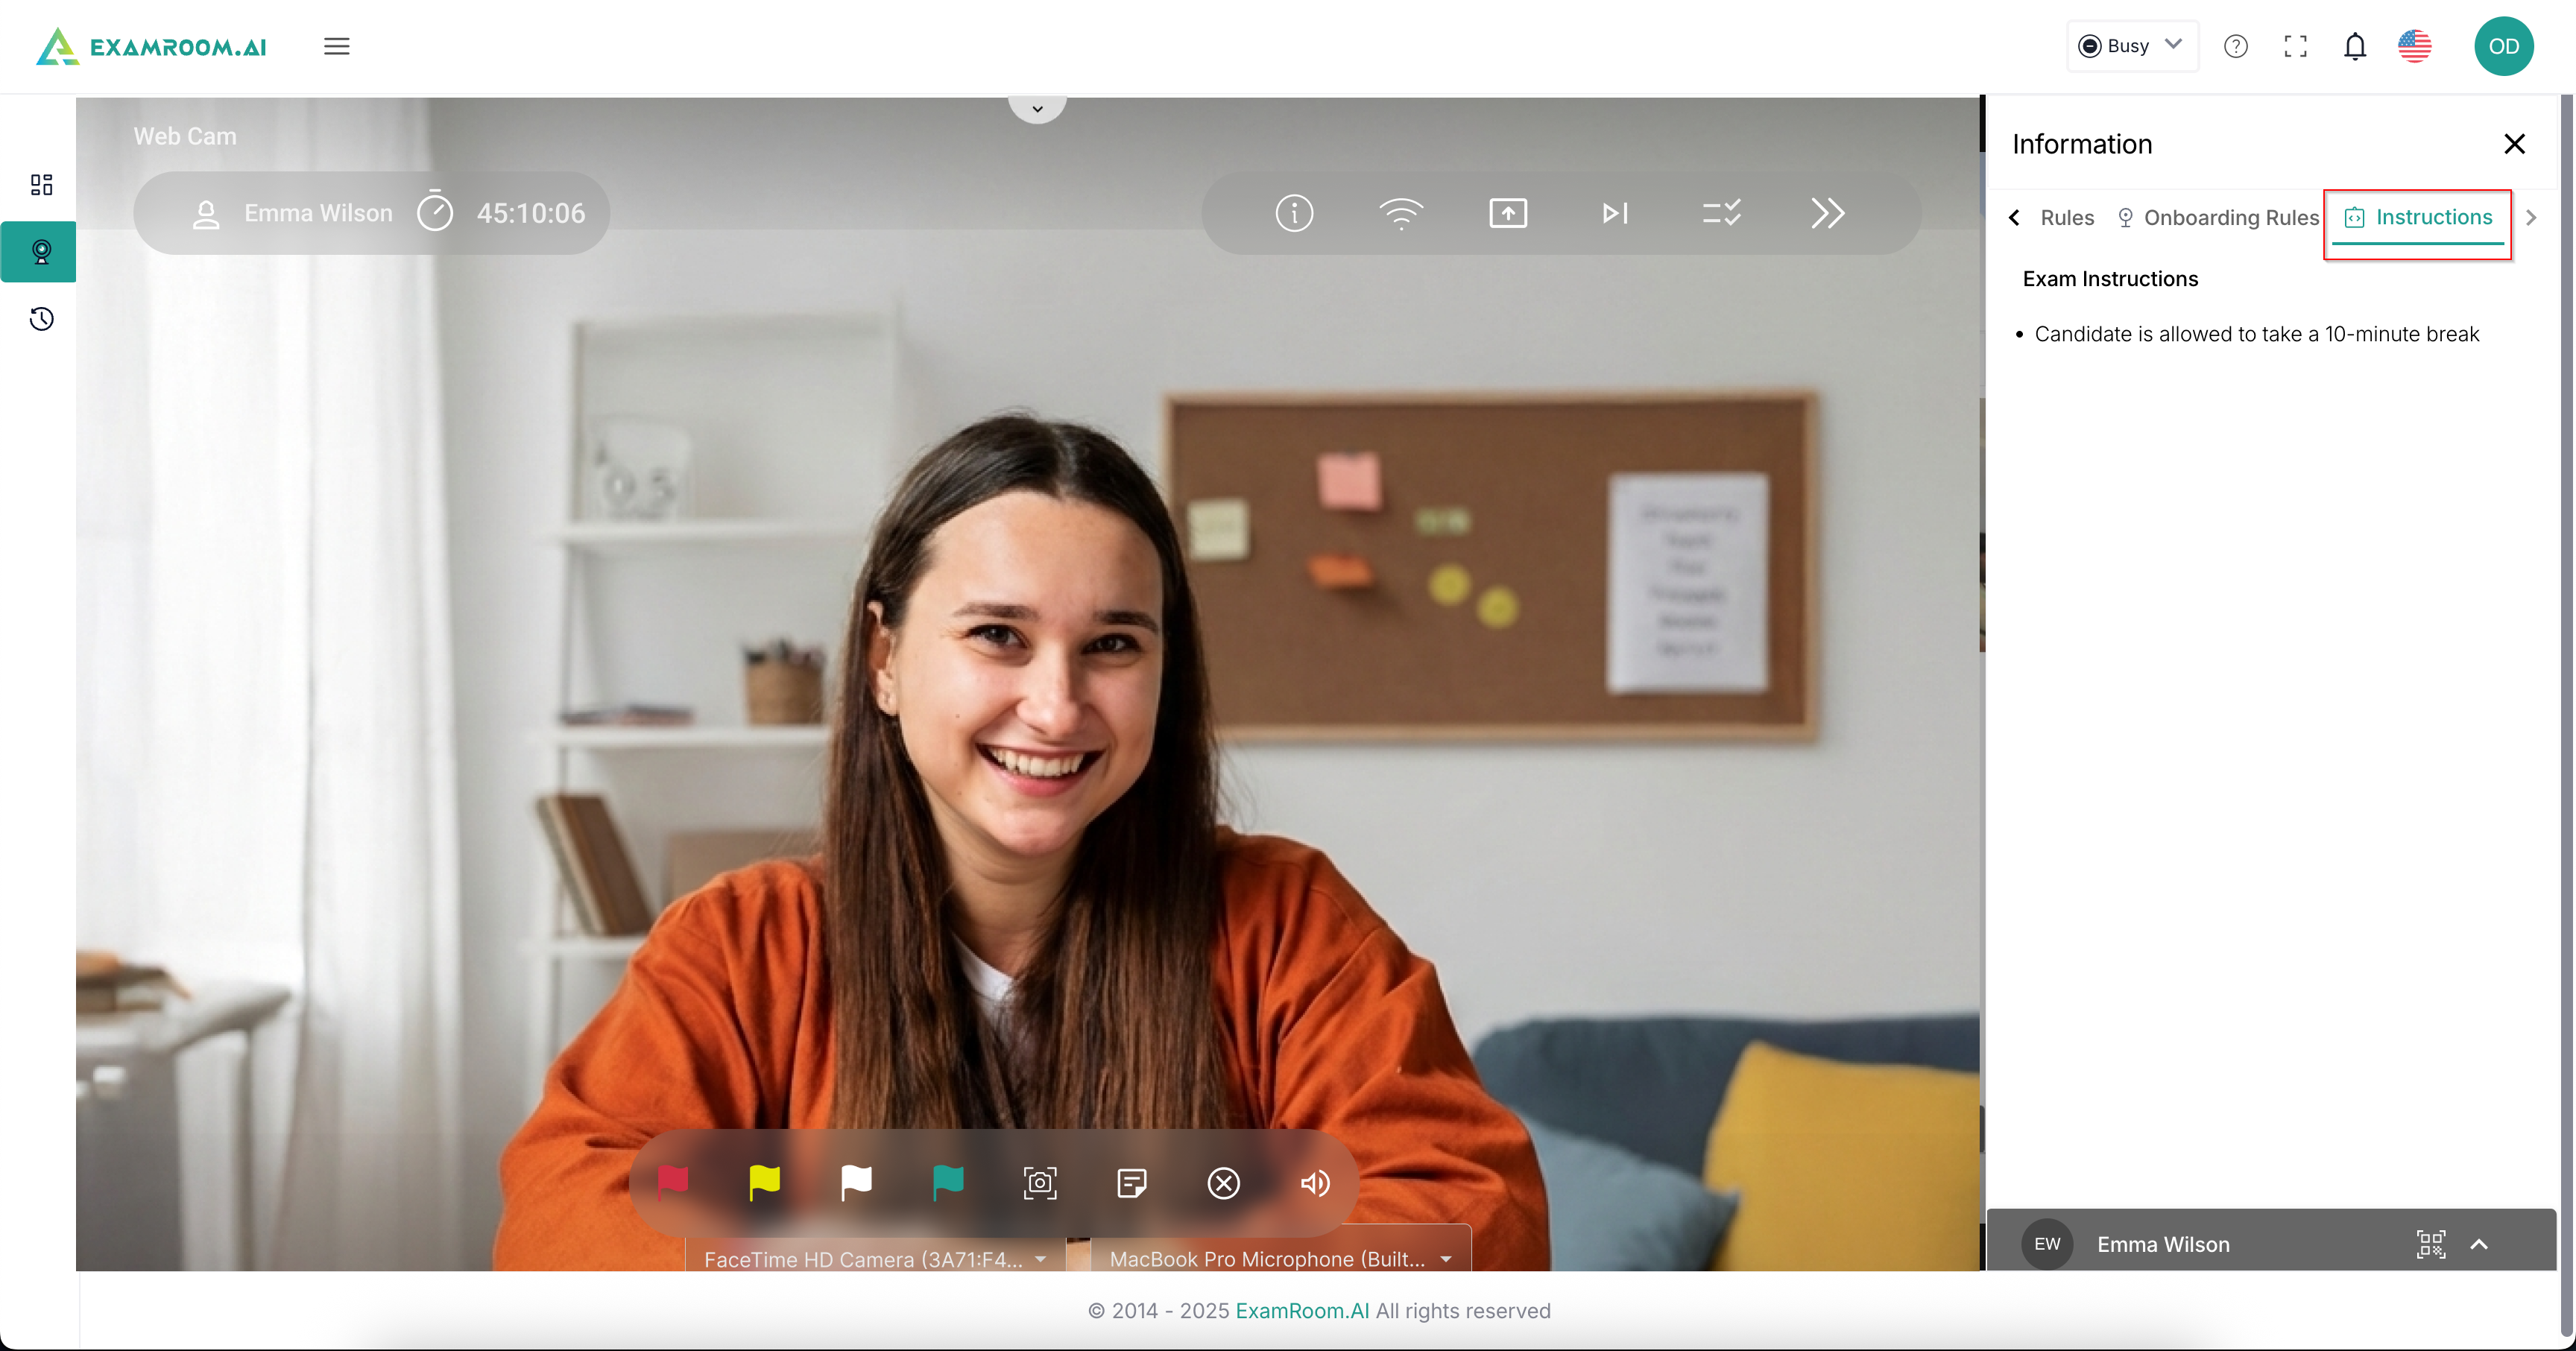
- Info: Click the Information icon to see the Exam Details, Exam Rules, Onboarding Rules, and Instructions on the right-side Panel.
- Exam Details: Displays exam details of the candidate you are currently onboarding.
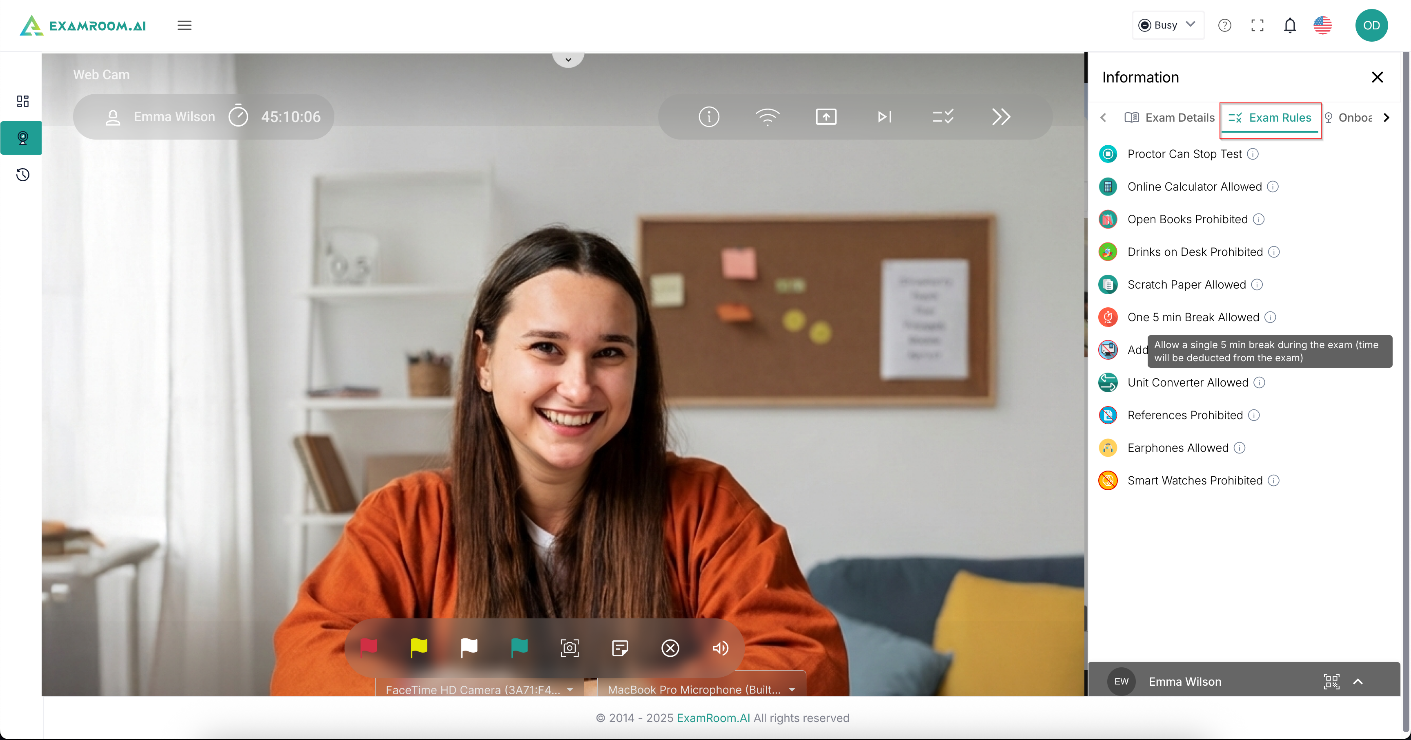
- Exam Rules: Displays exam rules for the candidate. Hover over the (i) icon to view more details about the listed exam rules.
- Onboarding Rules: Displays onboarding rules, a list of needed verification. Hover over the (i) icon to view more details.
- Instructions: Displays additional Exam Instructions if added by the exam sponsors.
- Exam Details: Displays exam details of the candidate you are currently onboarding.
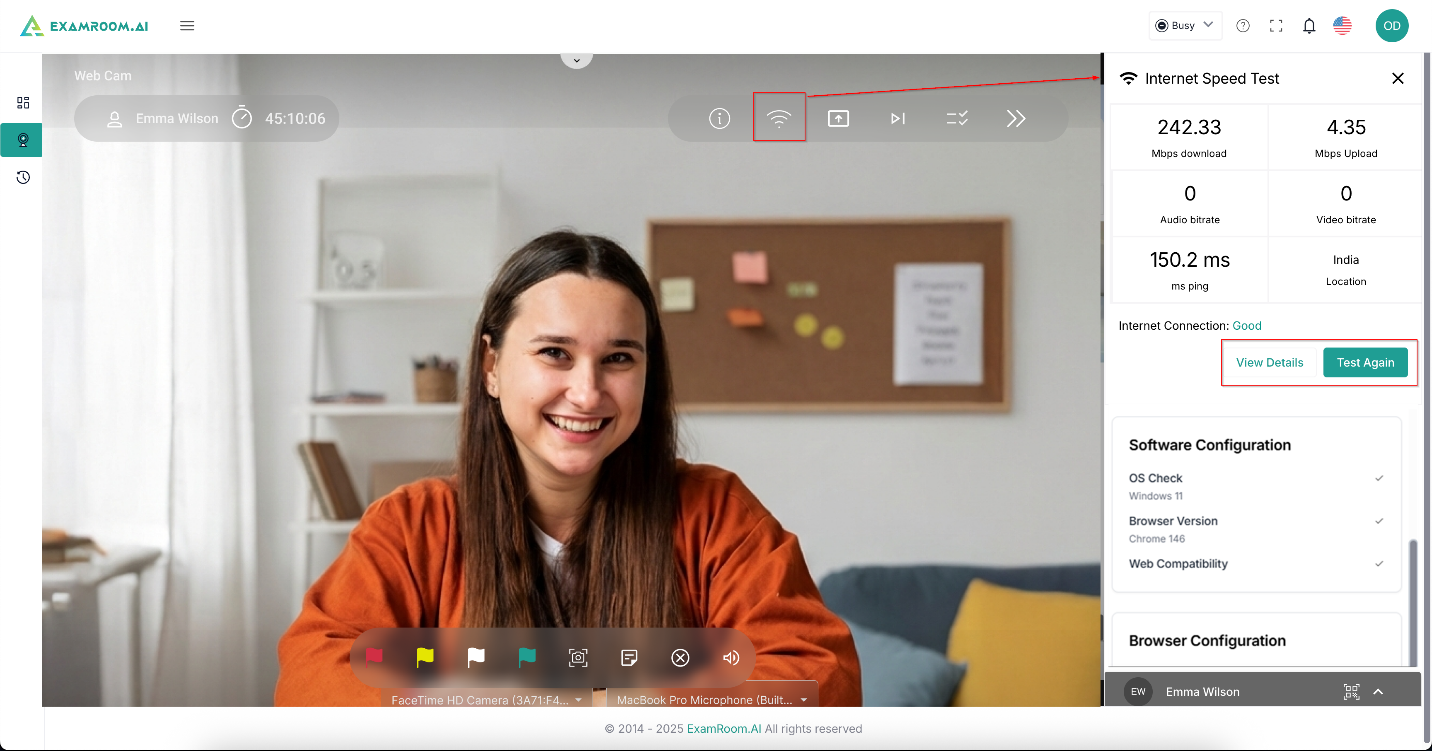
- Wi-Fi: Click the Wi-fi icon to see internet speed and connection details. You can also view your system's hardware, software, and browser configurations. Click Test Again to check and reload the data. Click View Details to view the connection details.
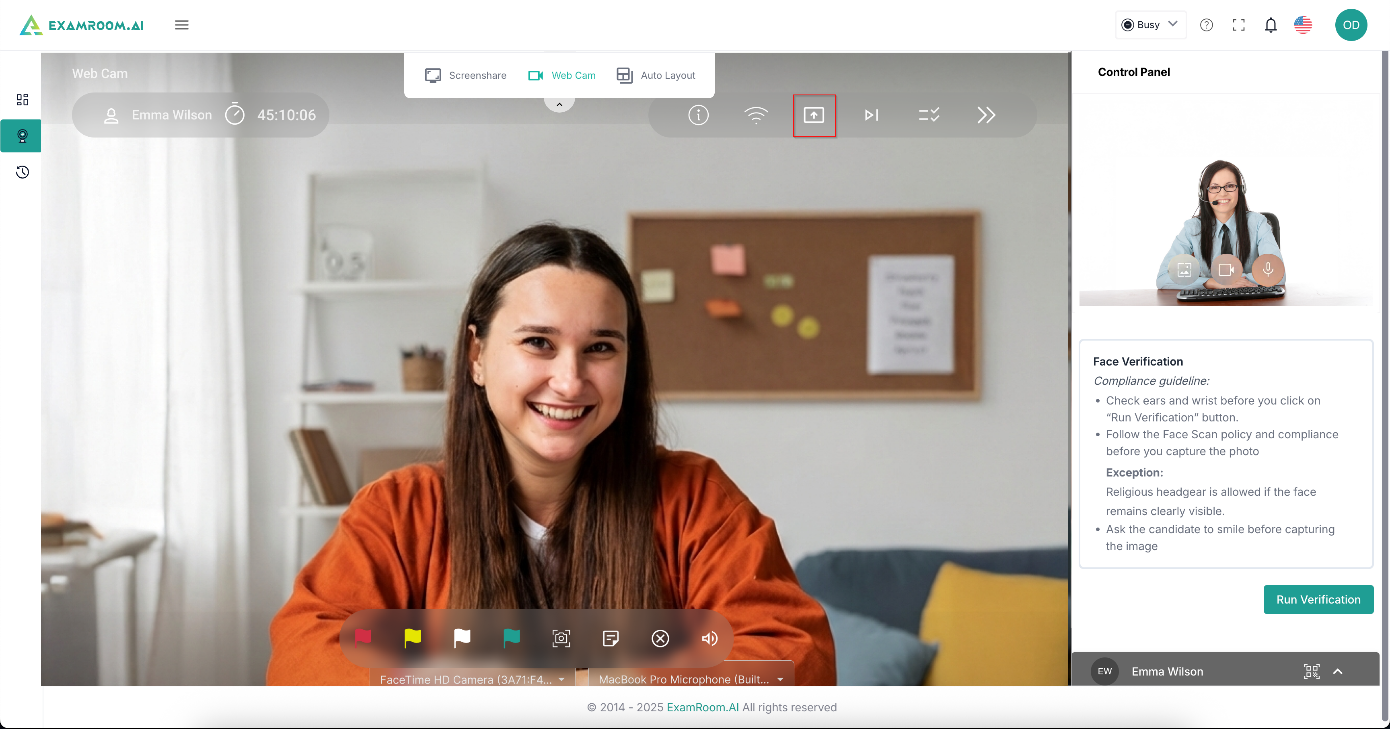
- Screenshare: Click the Screen Share icon to request the candidate to share their screen. Once the candidate shares the screen, you get complete access to the candidate's screen.
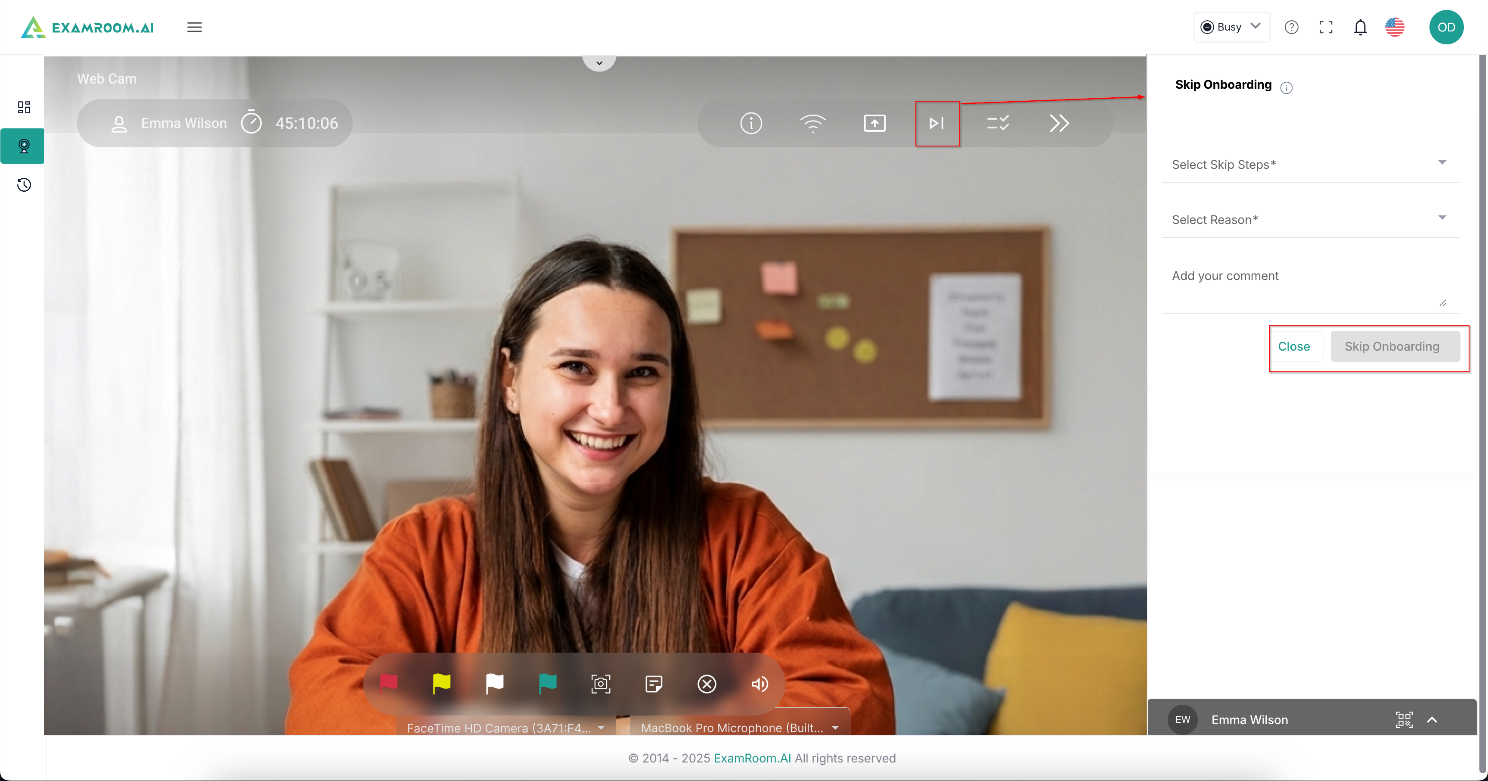
- Skip: Click to skip the verification process. Select the steps for skipping from the drop-down and the reason as well in the right panel, add comments if any, and click Skip Onboarding. (In case the candidate is connecting more than once, you can skip the steps of onboarding till the step completed in the previous session.)
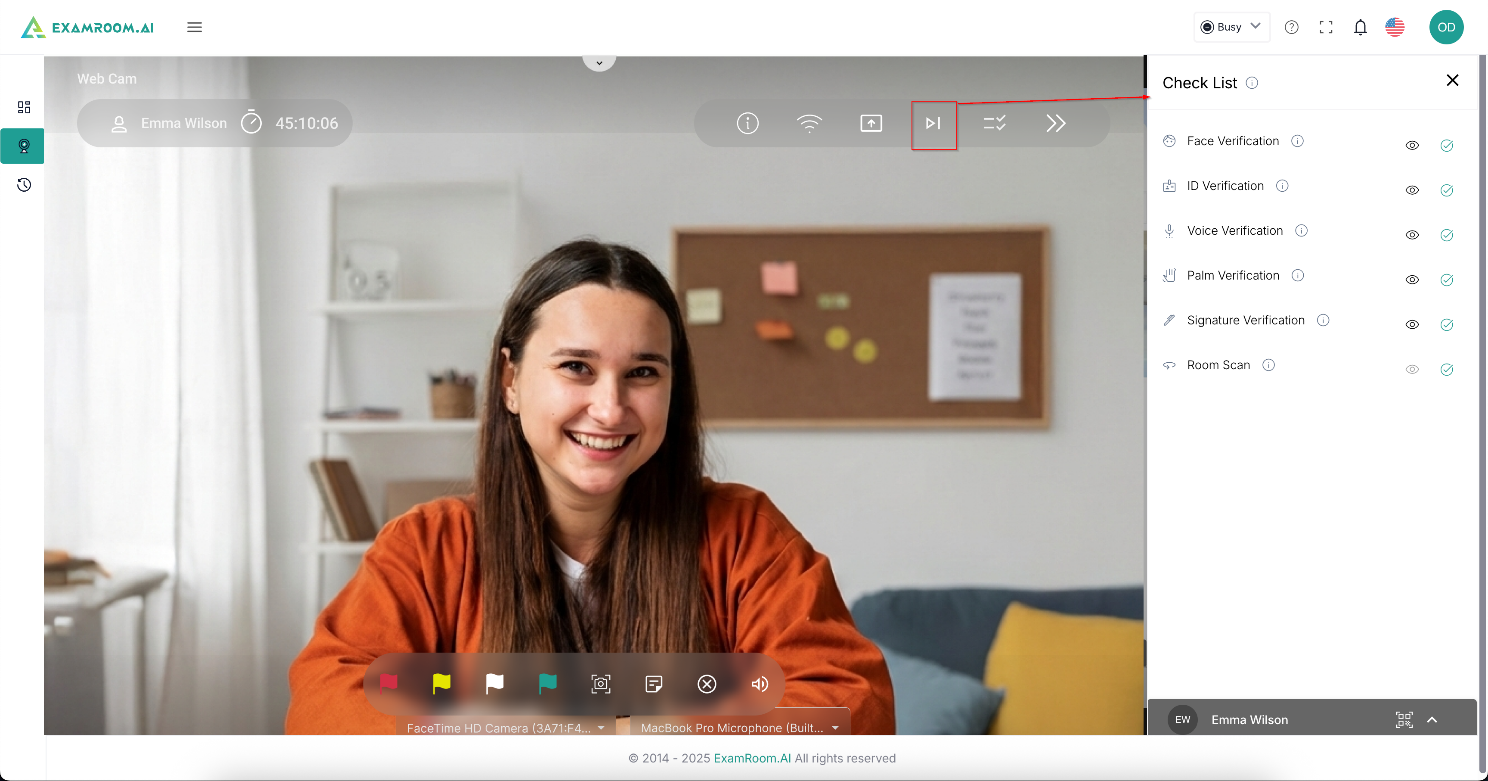
- Checklist: Click the Checklist icon to view the verification status in the right panel. It shows all green after the candidate’s verification has been completed. You can also click the view icon to check the associated data.
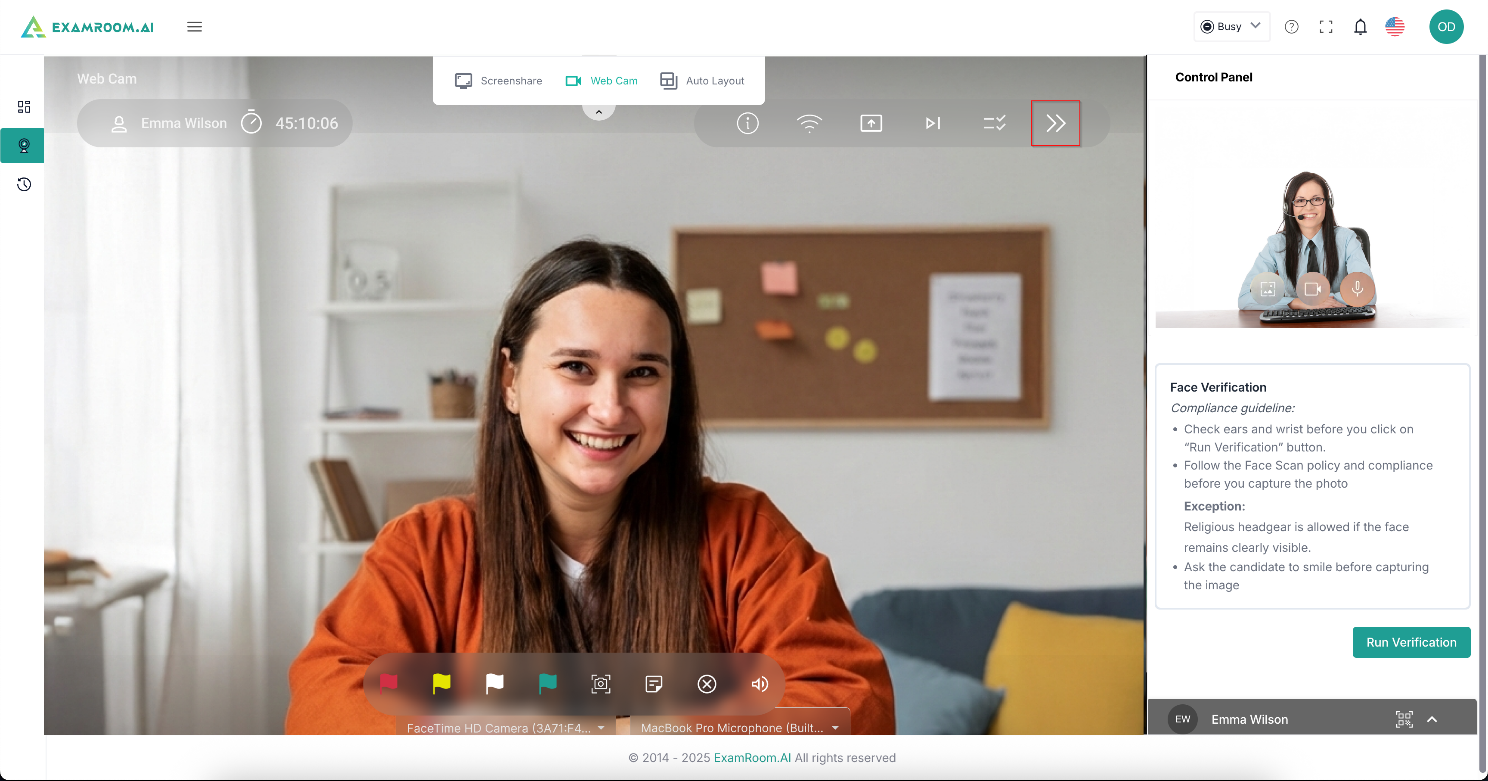
- Toggle Sidebar: Click to expand or collapse the side Control Panel.
Bottom Ribbon Options
Click the following options at the bottom ribbon; the right Control Panel reflects relevant data and parameters:
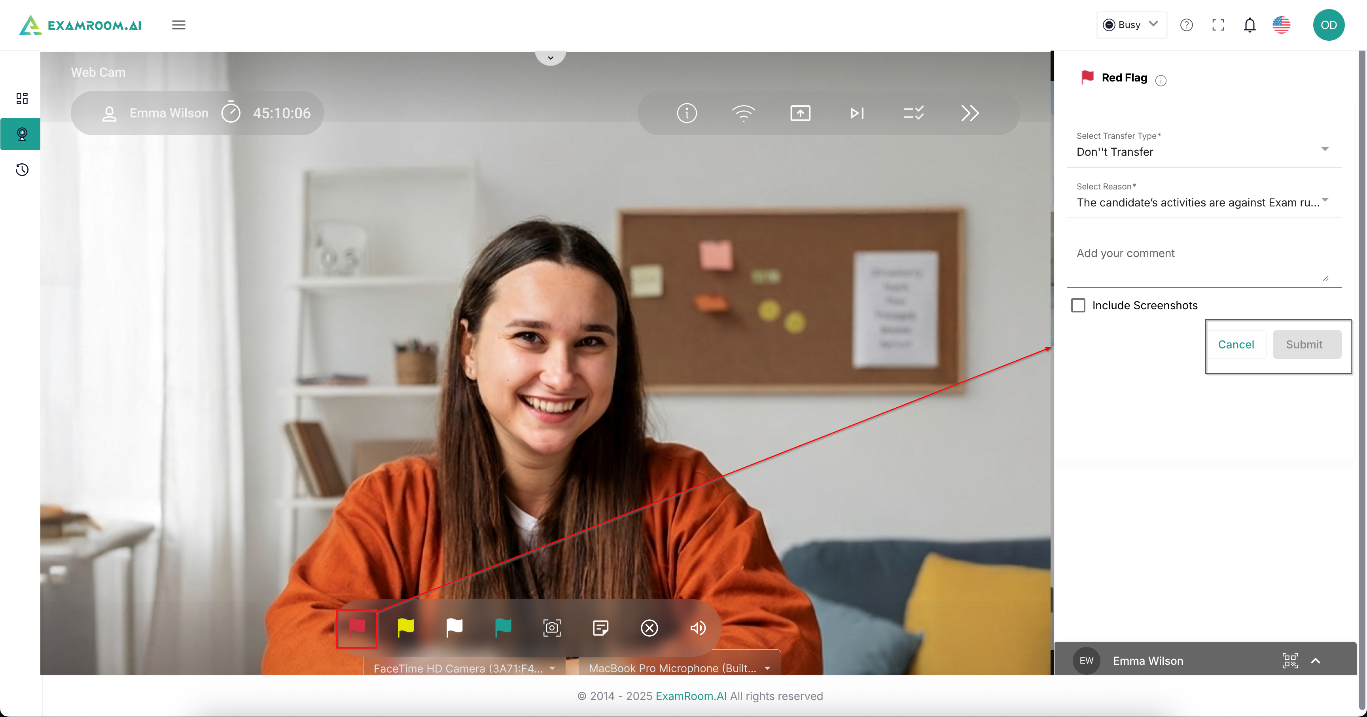
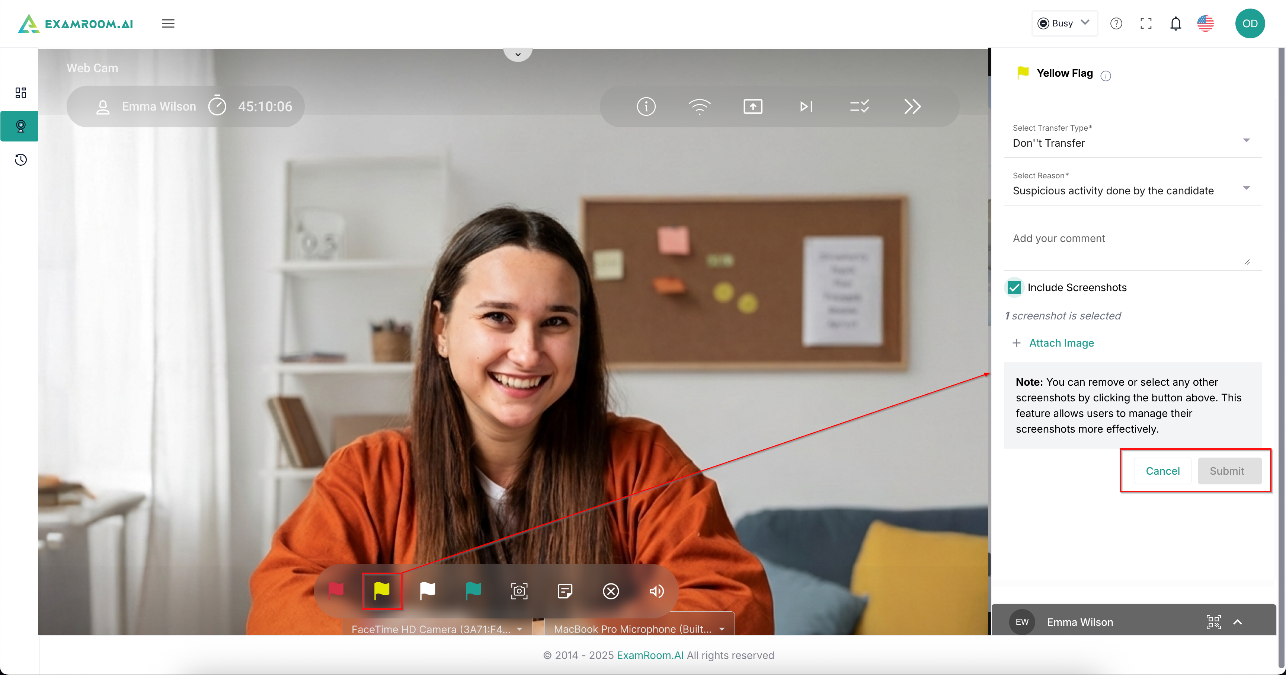
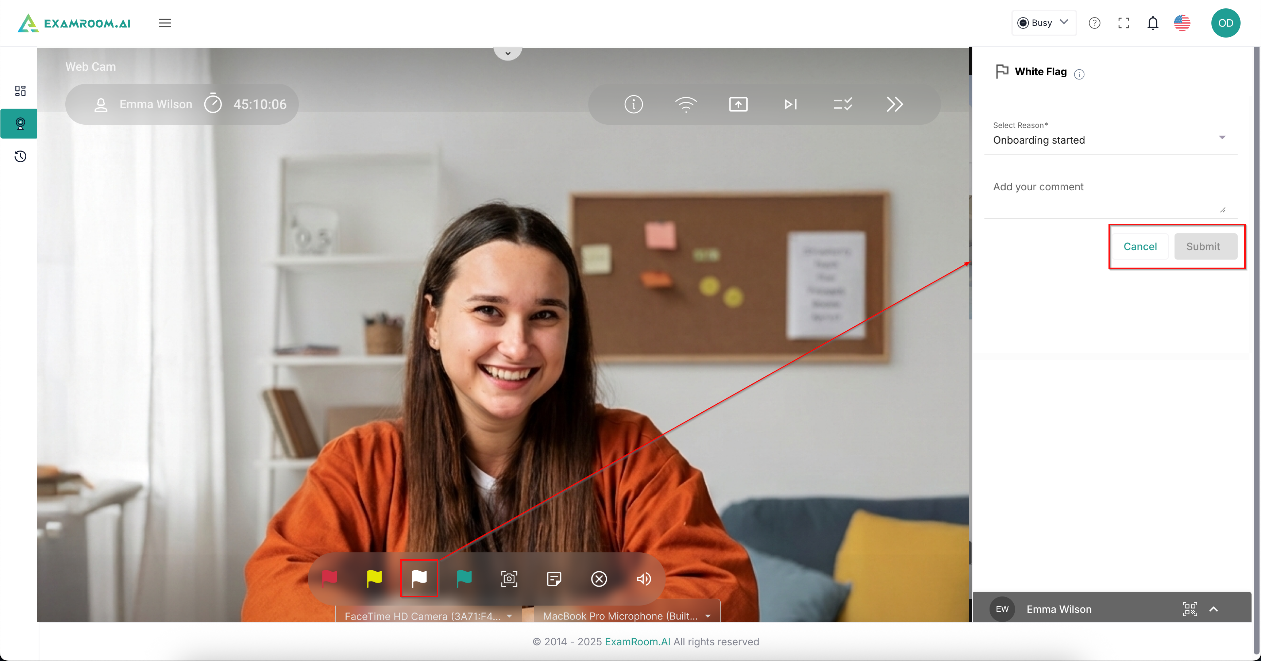
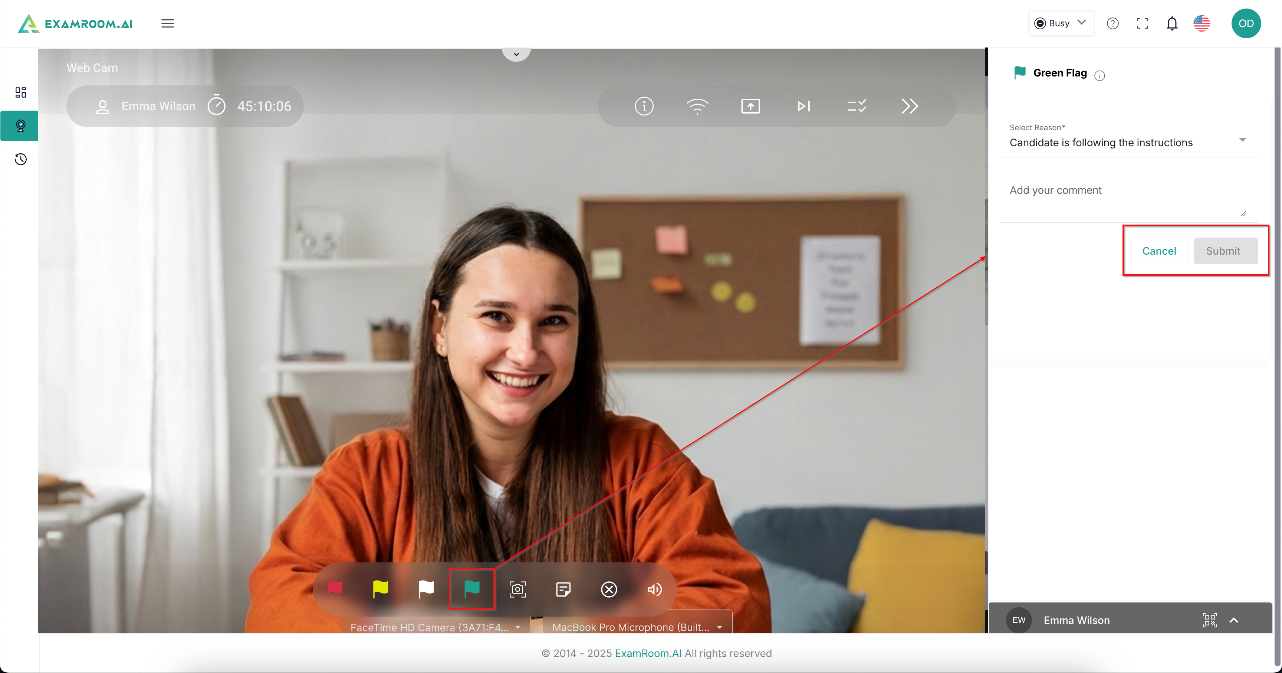
- Raising Flag: Click the flag to raise the respective flag based on the rules mentioned ahead. In the right panel, select the transfer type (valid for red and yellow flags) and reason, add a comment, and select the checkbox to include a captured screenshot if applicable. Click Submit to raise the respective flag. Click Cancel to exit the raising flag option.
Note: The following is the information to consider while raising the flag:- Red Flag
- If the candidate’s activities are against ExamRoom onboarding/client rules.
- If the candidate performs any other malpractice, and you confirm the suspicion.
- If the candidate is found using a phone other than the phone currently in use with the 360 applications.
- If the candidate is speaking to someone even after you have given a warning.
- Usage of smartwatches/Bluetooth devices, etc., to cheat.
- Leave the current tab and open a new one if not allowed.
- Take pictures of the screen.
- Use of more than one screen.
- If the candidate has a screen recording on.
- If client rules do not permit the usage of computer-assisted translation tools or certain websites, and the candidate is found using any of those.
- Yellow Flag
- If any suspicious activity is done by the candidate.
- If the candidate goes on a break without informing.
- If the candidate goes on permitted/emergency breaks and does not return within the specified time.
- If the candidate moves out of the camera frame and is absent for a long time or continues to do so even after you have notified them repeatedly.
- If the verification or authentication process fails.
- White Flag
- General remarks: The candidate is taking a break by informing you, and once back, the candidate is back from the break to resume the onboarding.
- If the candidate is using the ExamRoom 360 application and the feed is lost (possibly due to a low battery/phone getting dislodged from its place/phone locking itself). You need to confirm that it was not a deliberate attempt and raise a white flag.
- Green Flag
- Raised at the beginning and on completion of each step of the onboarding session.
- When the candidate completes the onboarding session.
- Indicate that the candidate onboarded without any issues and abiding by the onboarding rules.
- For every four white flags raised, a green flag should be raised.
- If you find something suspicious and raise a yellow flag, and it turns out to be false, raise a green flag to counter the yellow flag raised due to suspicion.
- Red Flag
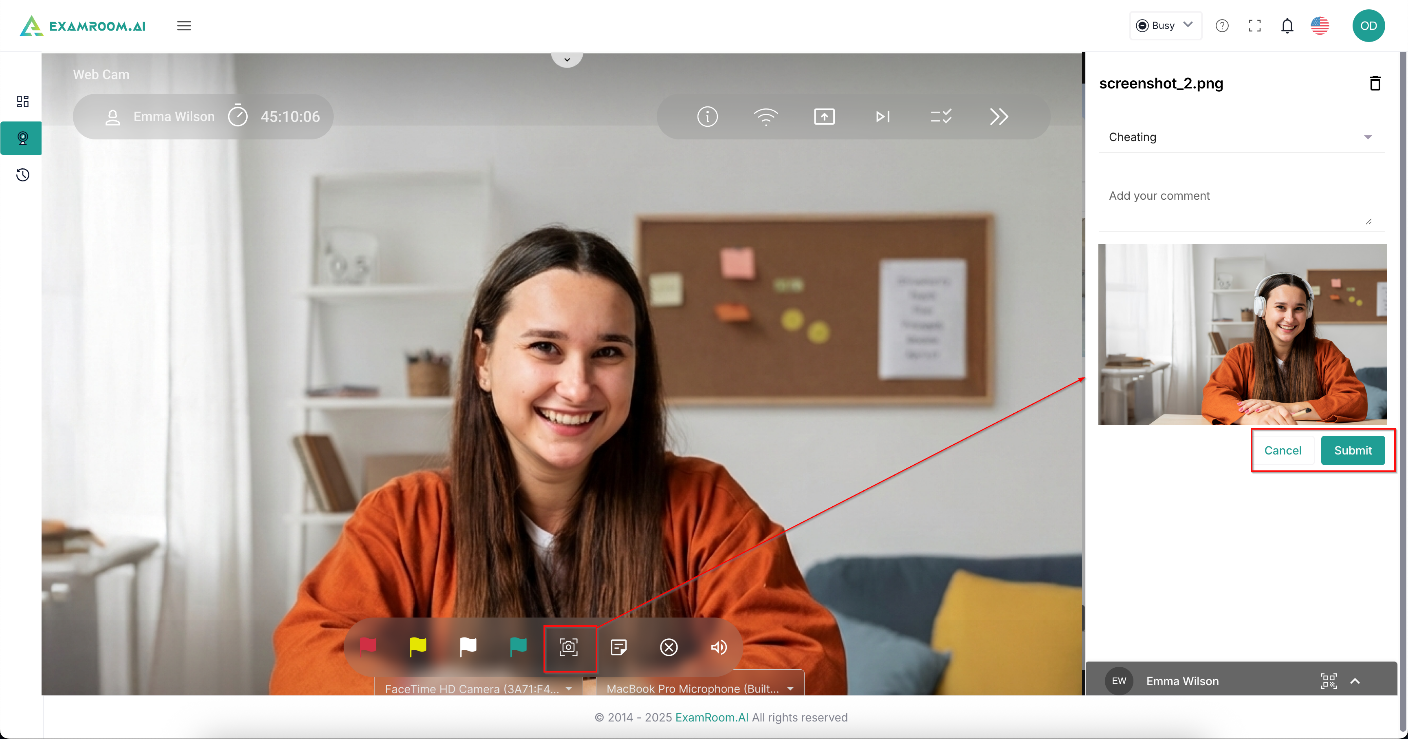
- Screenshot: Click the Screenshot icon to capture a screenshot of the candidate. The panel on the right has the fields to select the reason from the drop-down menu and add comments, if any. Click Submit to save and submit the screenshot.
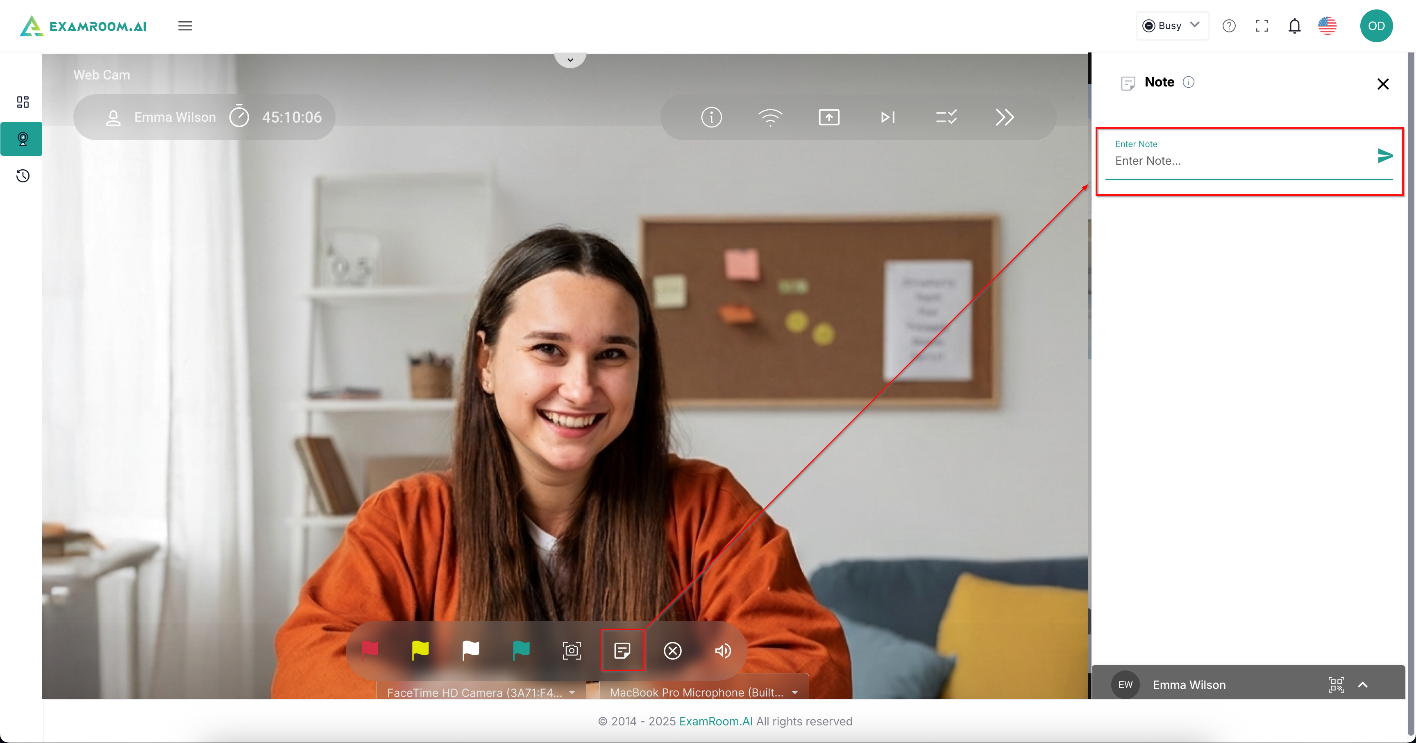
- Notes: Click the Note icon to provide additional notes on the right panel for each onboarding session for every candidate. These notes are mapped to each exam that the candidate takes.
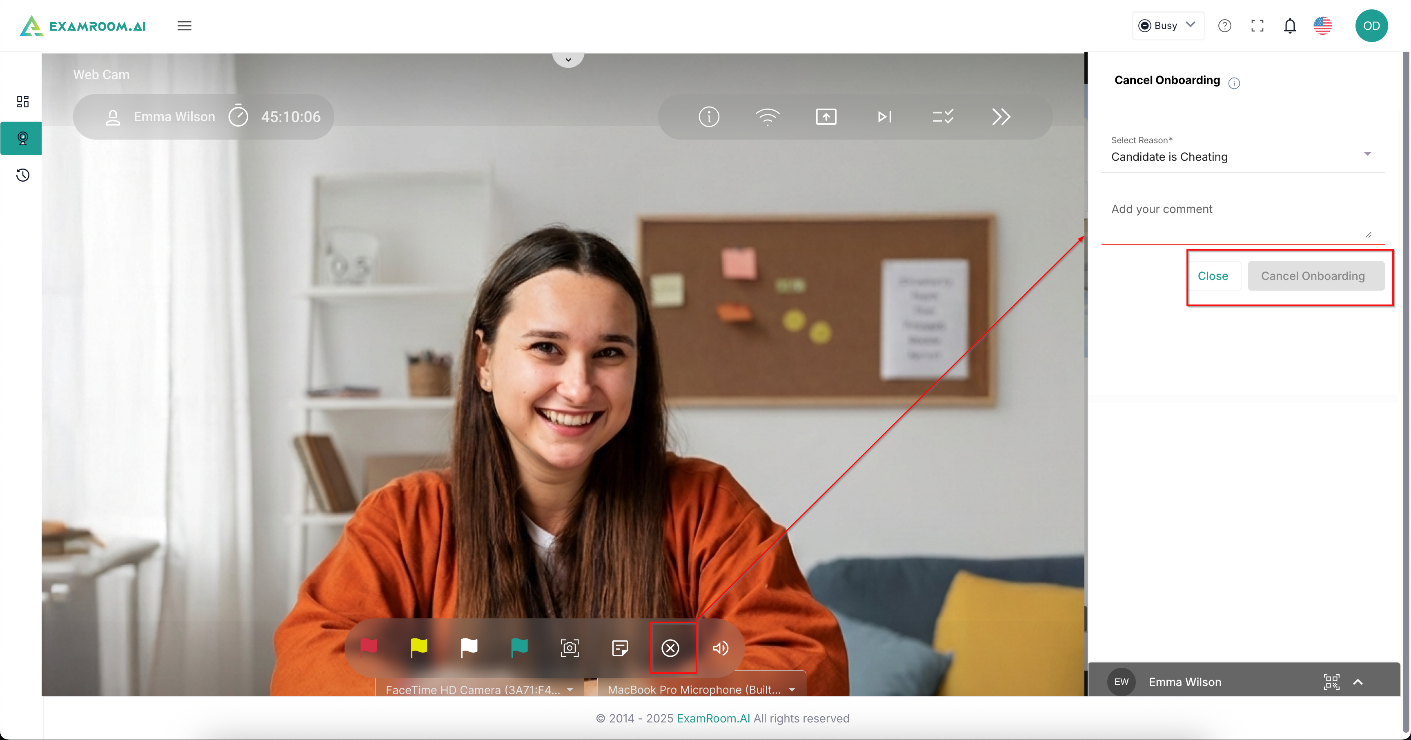
- Cancel Onboarding: Click the Cancel Onboarding icon to cancel the onboarding of the respective candidate. The right panel has fields to enter the reason and add comments, if any.
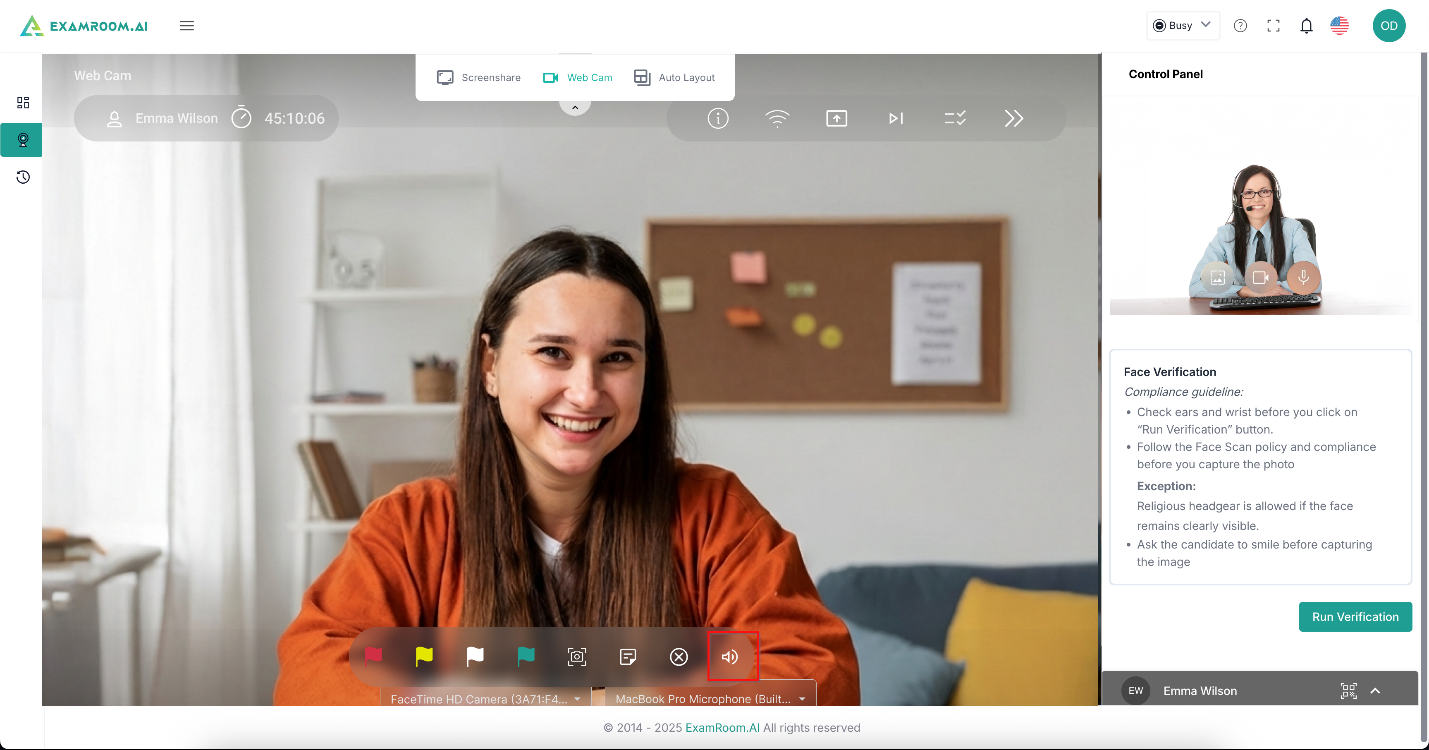
- Speaker: Click the Speaker icon to mute or unmute the candidate's sound. The microphones of all candidates are turned on by default. (Since it is ideal for you to be able to hear the candidates to detect malpractice, if any)
Chat with Candidate Option
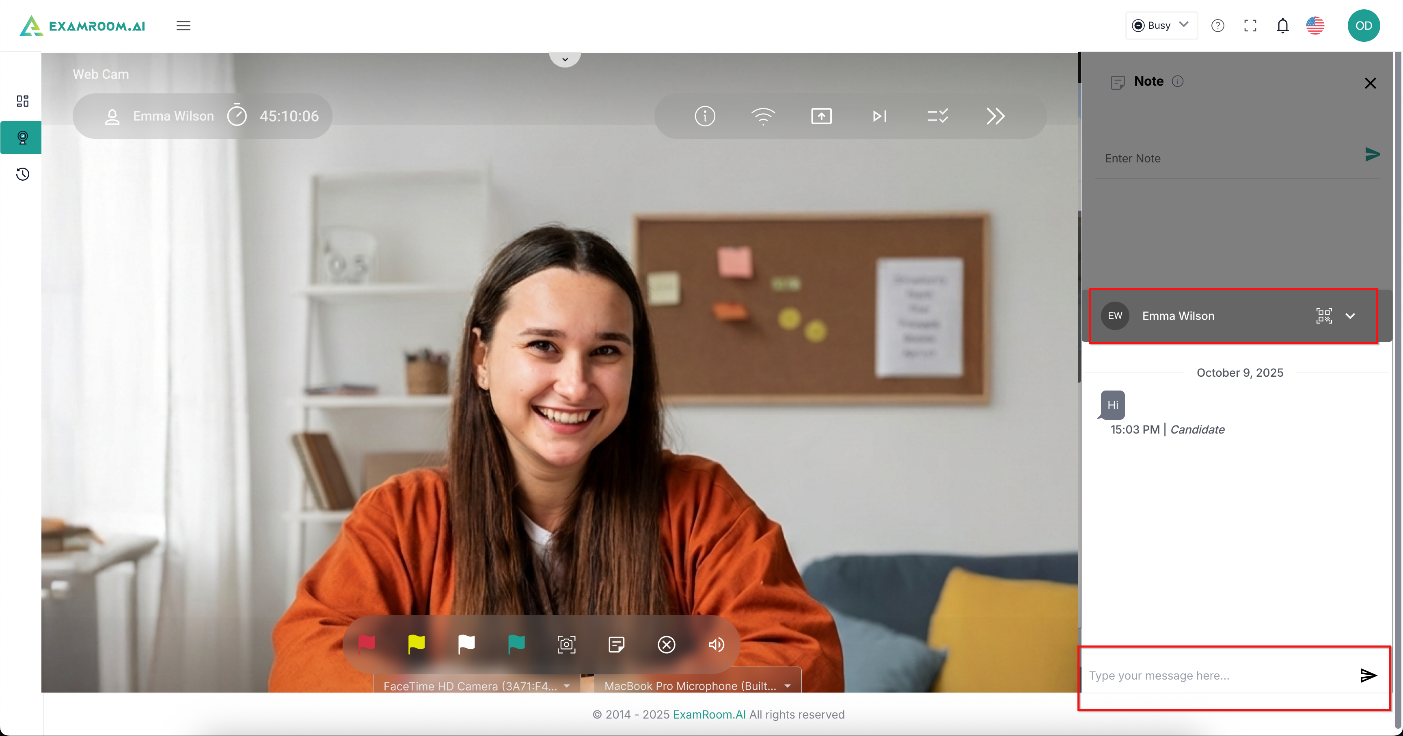
Use the chat option to contact the candidate at any point during the exam. It also alerts you if the candidate has sent any messages.
- Clicking the chat button at the bottom of the Control Panel opens the chat box Panel.
Run Verification
ID Verification
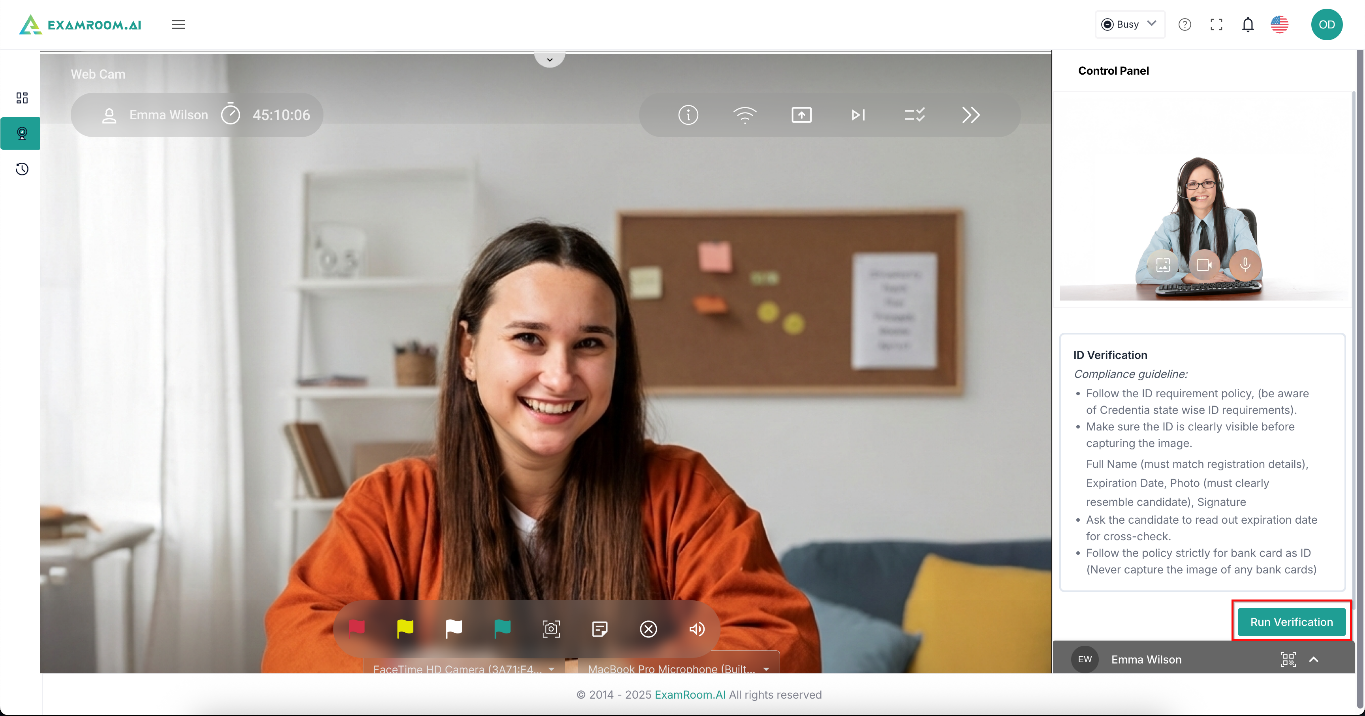
- Read the compliance guidelines and click Run Verification, available on the right-side panel, to start the ID verification process for the candidate.
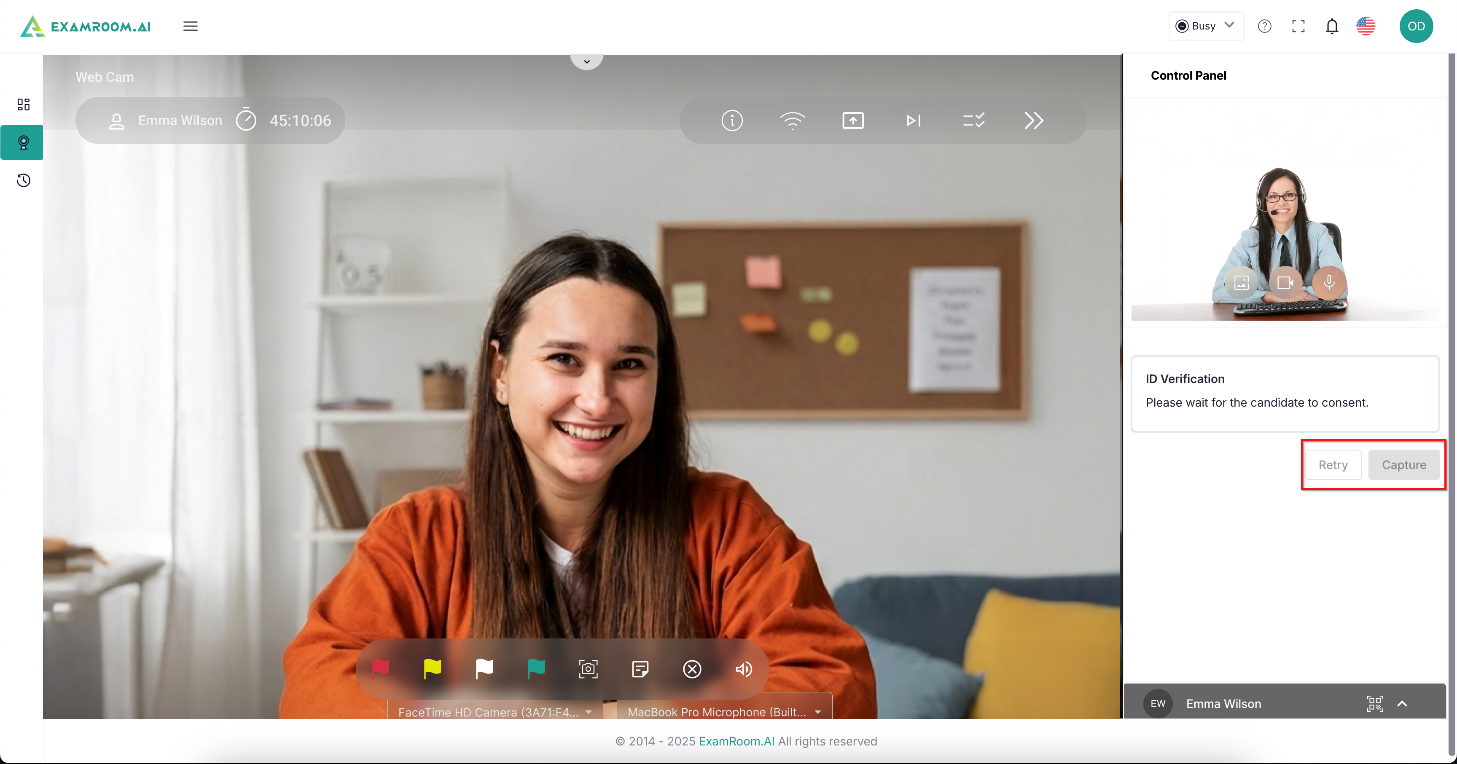
- Wait till the candidate gives the privacy consent, and then click Capture to verify the candidate’s ID and match it with the saved data. Click Retry to repeat the process.
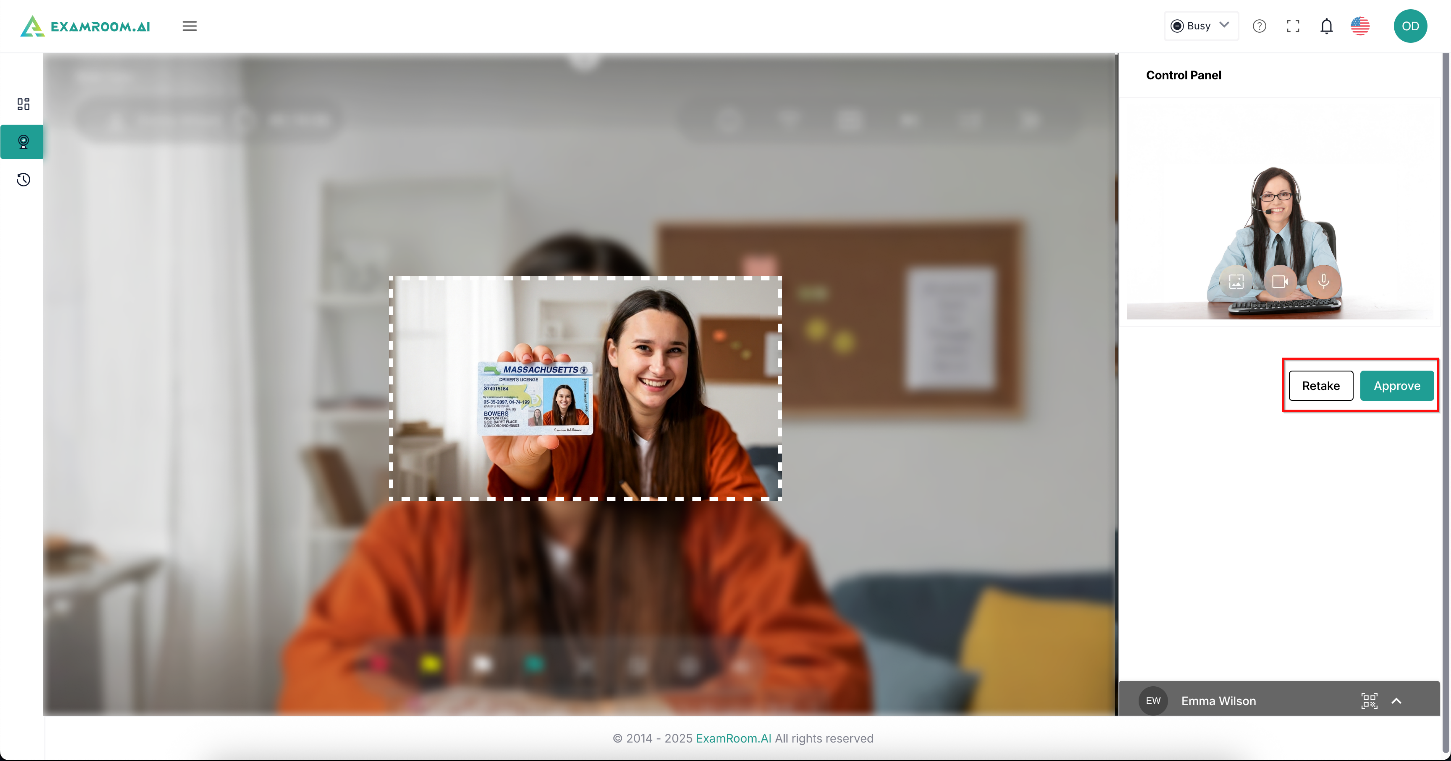
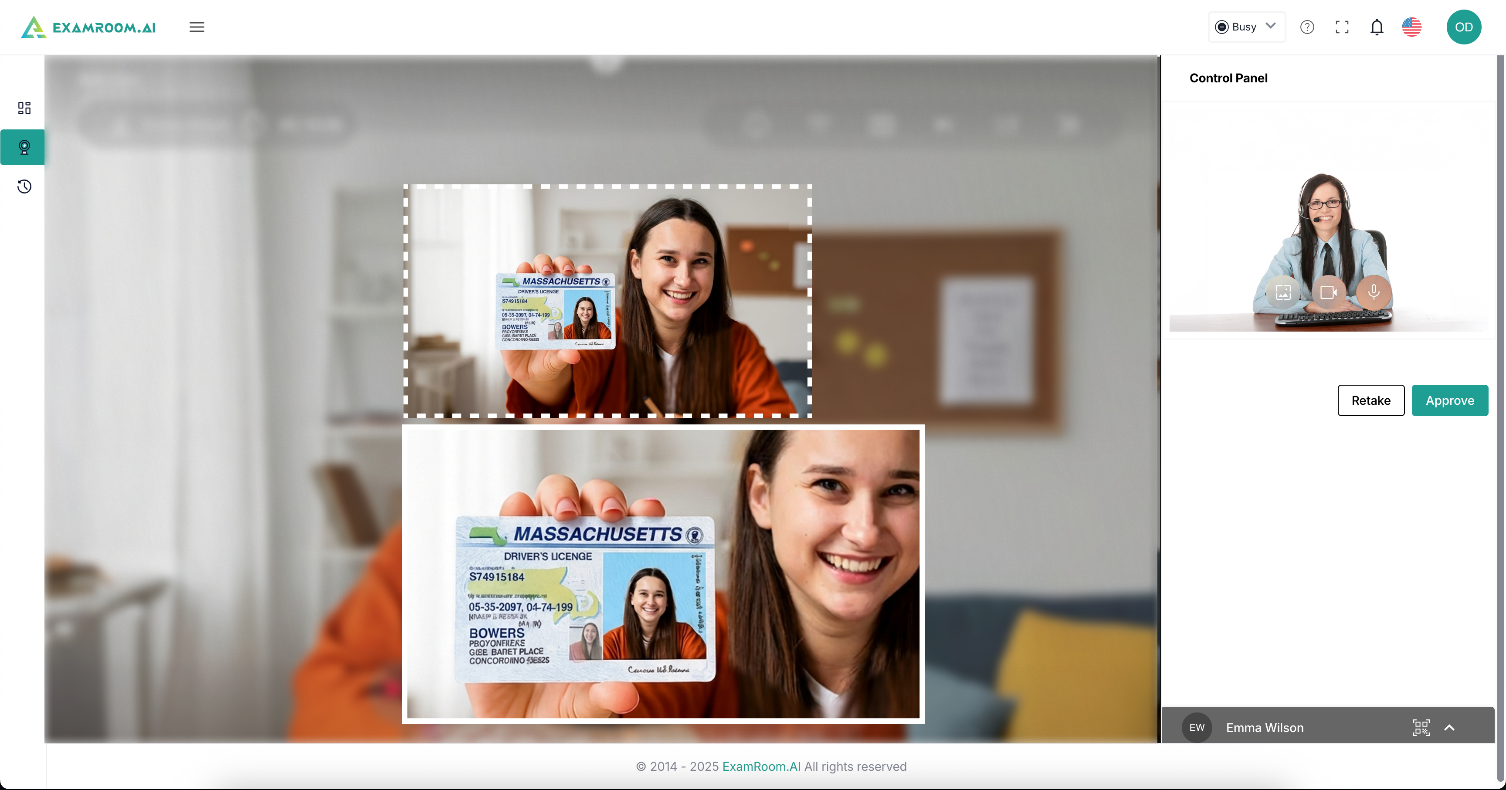
- Check the candidate details in the control panel and click Approve after the candidate’s ID verification picture is captured as per the compliance guidelines. If it does not match, click Retake and ask the candidate to repeat the process. The match percentage is also displayed on the screen.
Note: You can zoom in on the captured ID image for your visual convenience. Click on the captured preview image and use the mouse scroll to zoom.
Face Verification
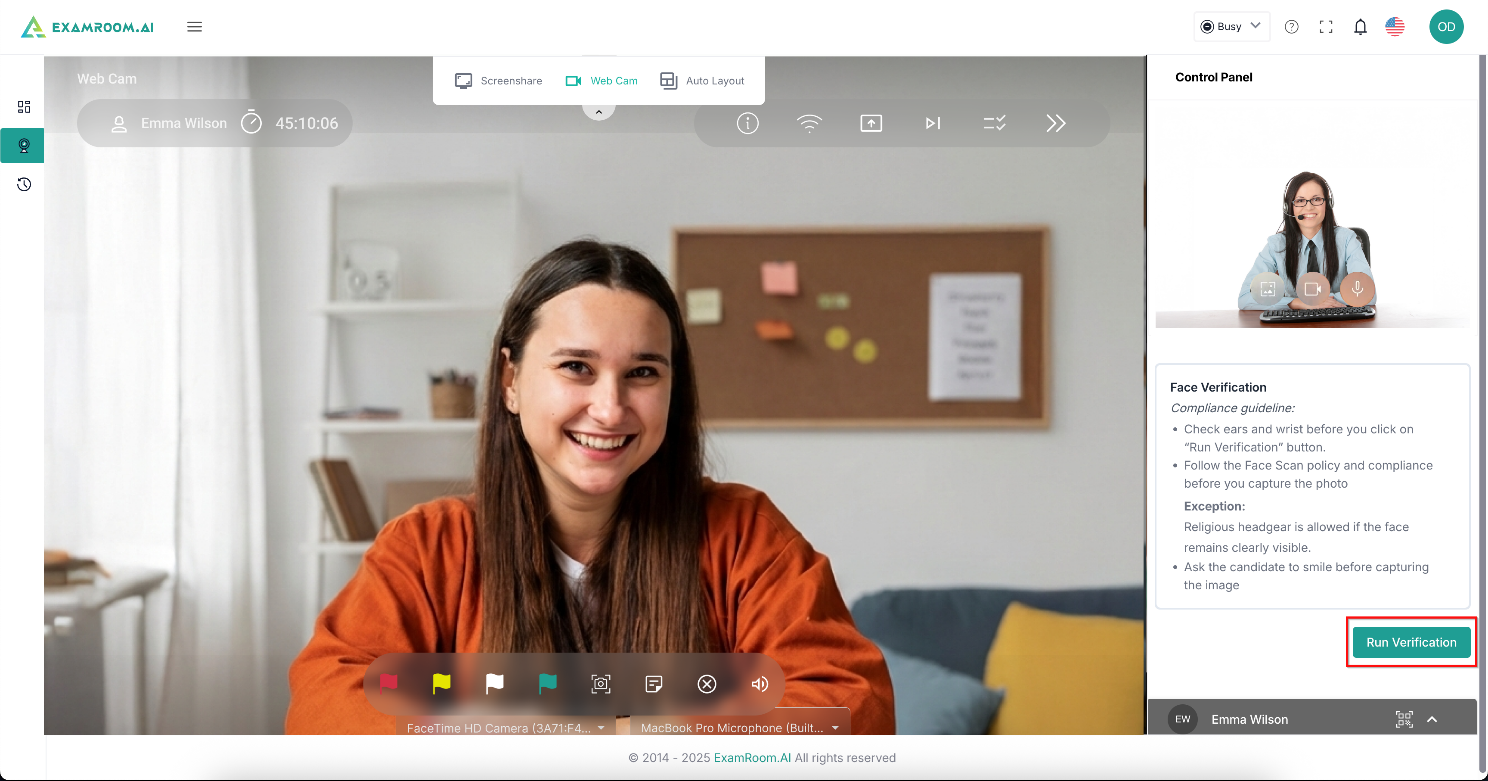
- Read the compliance guidelines and click Run Verification, available on the right-side panel, to start the face verification process for the candidate.
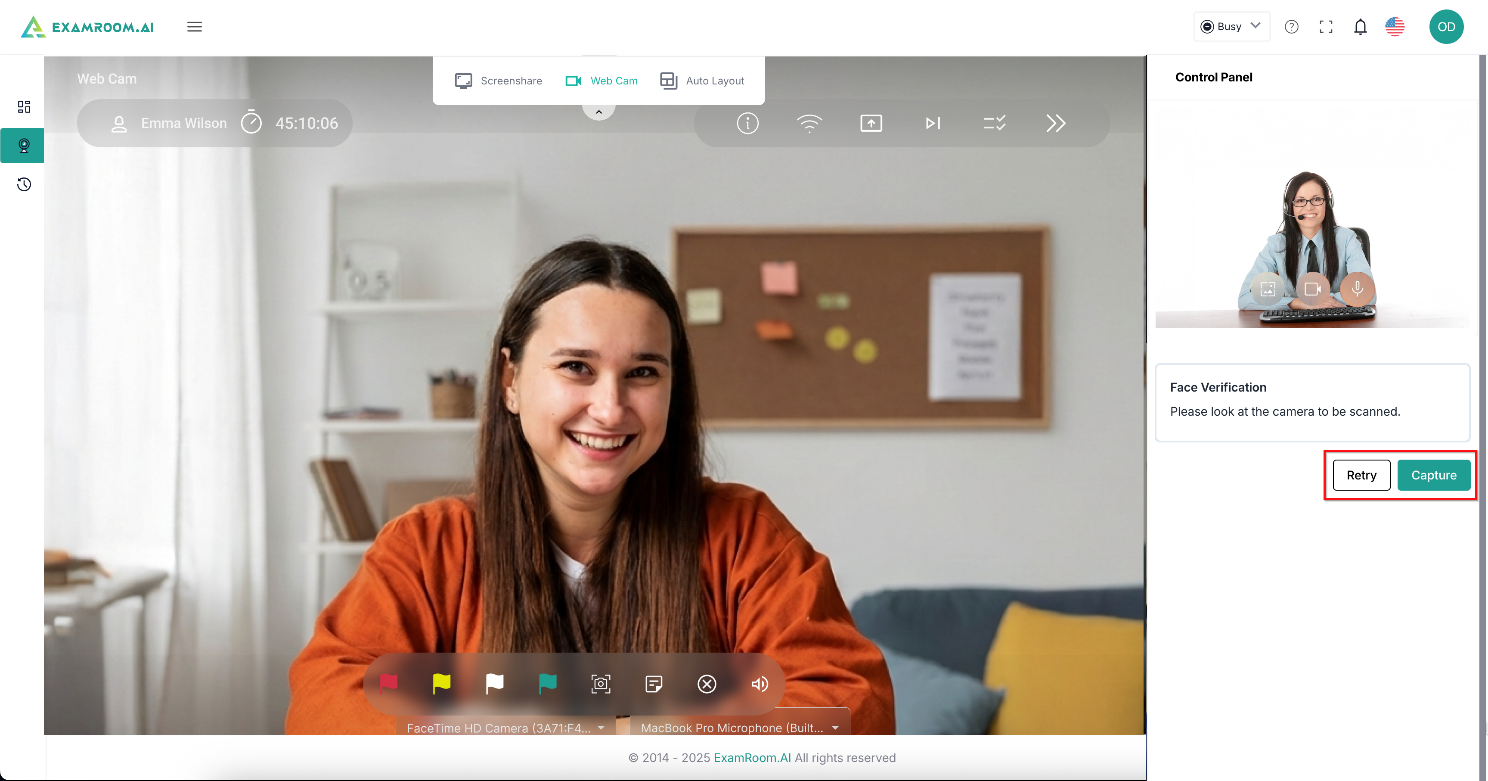
- Wait till the candidate gives privacy consent and then wait till it is auto captured by AI. If not, then click Capture to verify the candidate’s face and match it with the saved data. Click Retry to repeat the process.
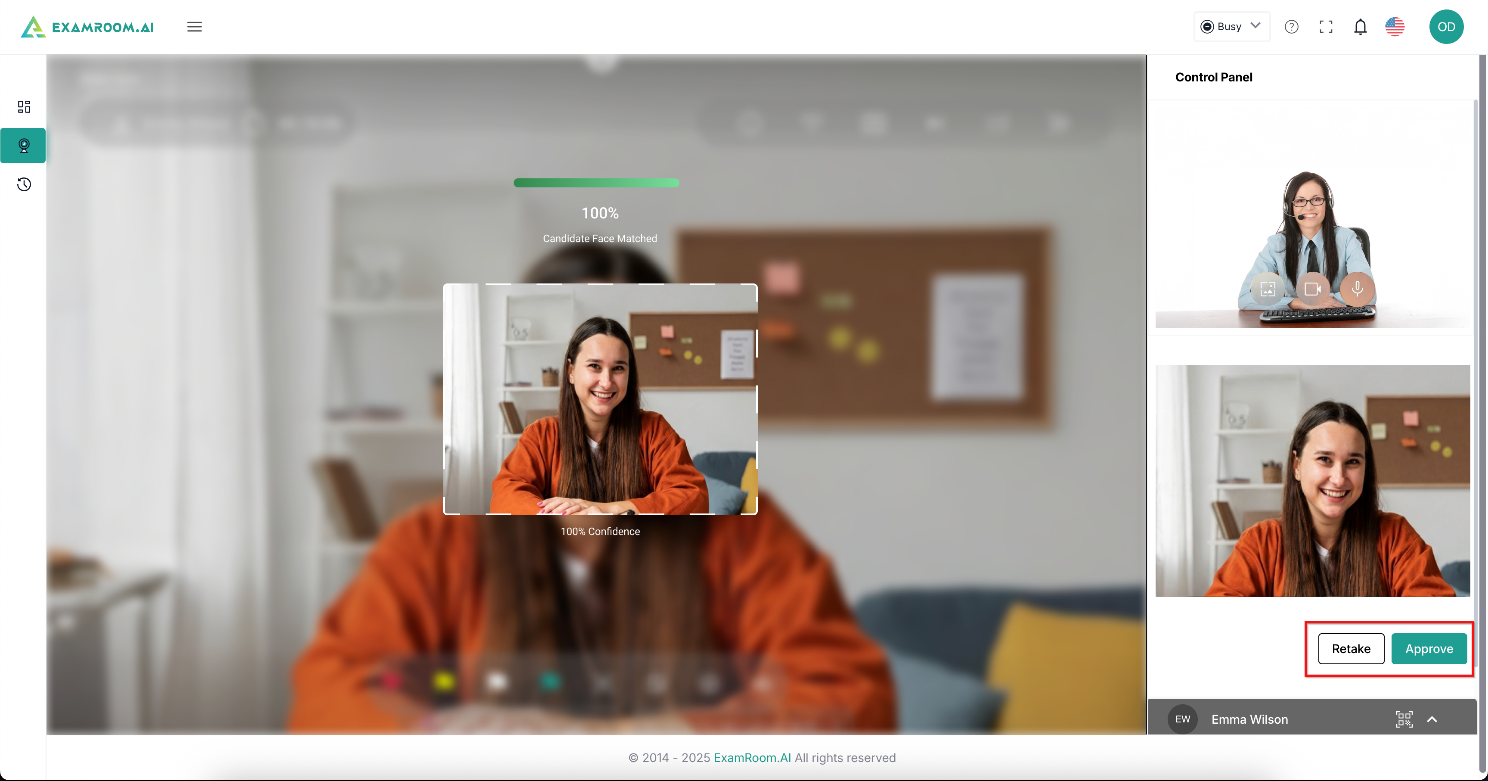
- Click Approve after the candidate’s face verification picture is captured as per the compliance guidelines. If it does not match, click Retake and ask the candidate to repeat the process. The match percentage is also displayed on the screen.
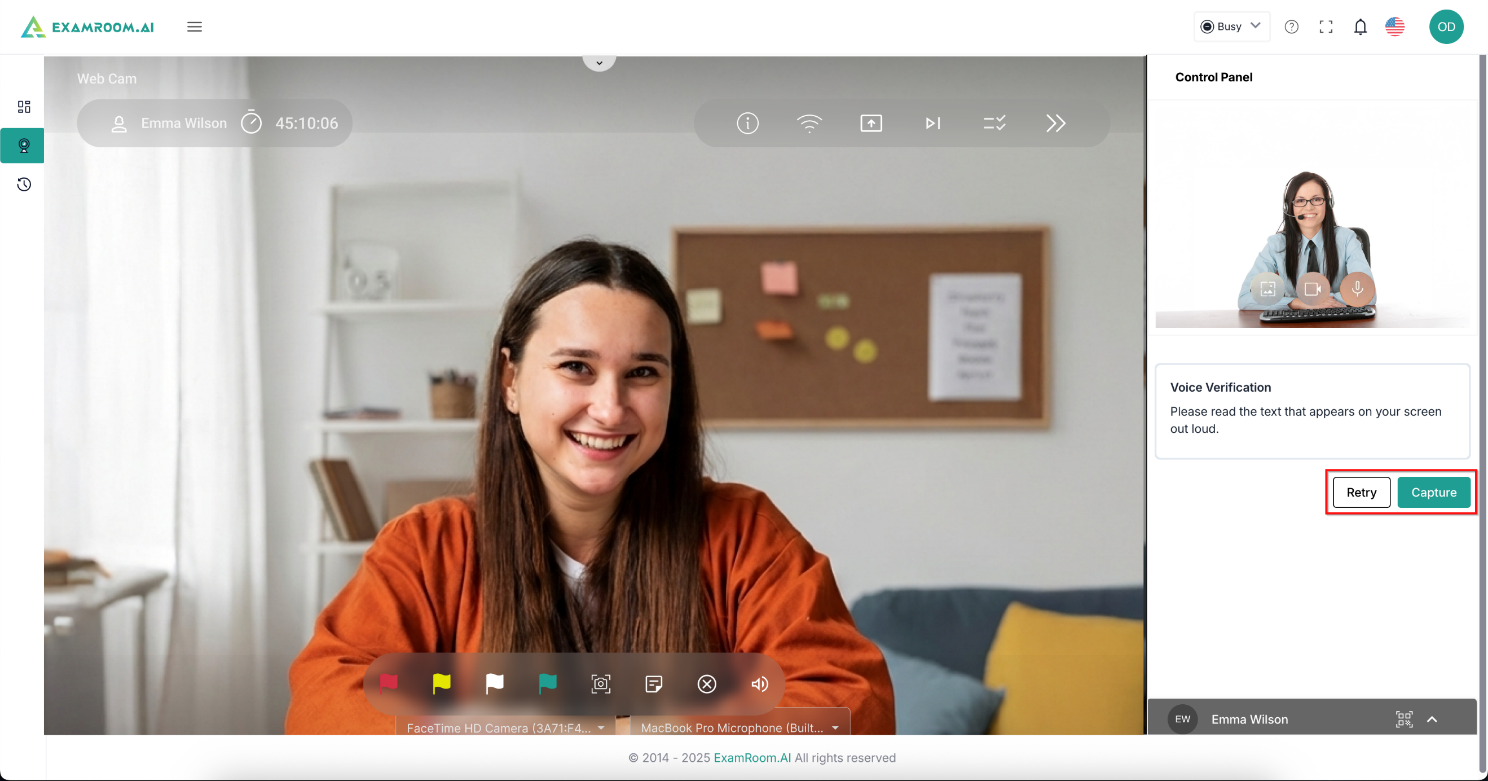
Voice Verification
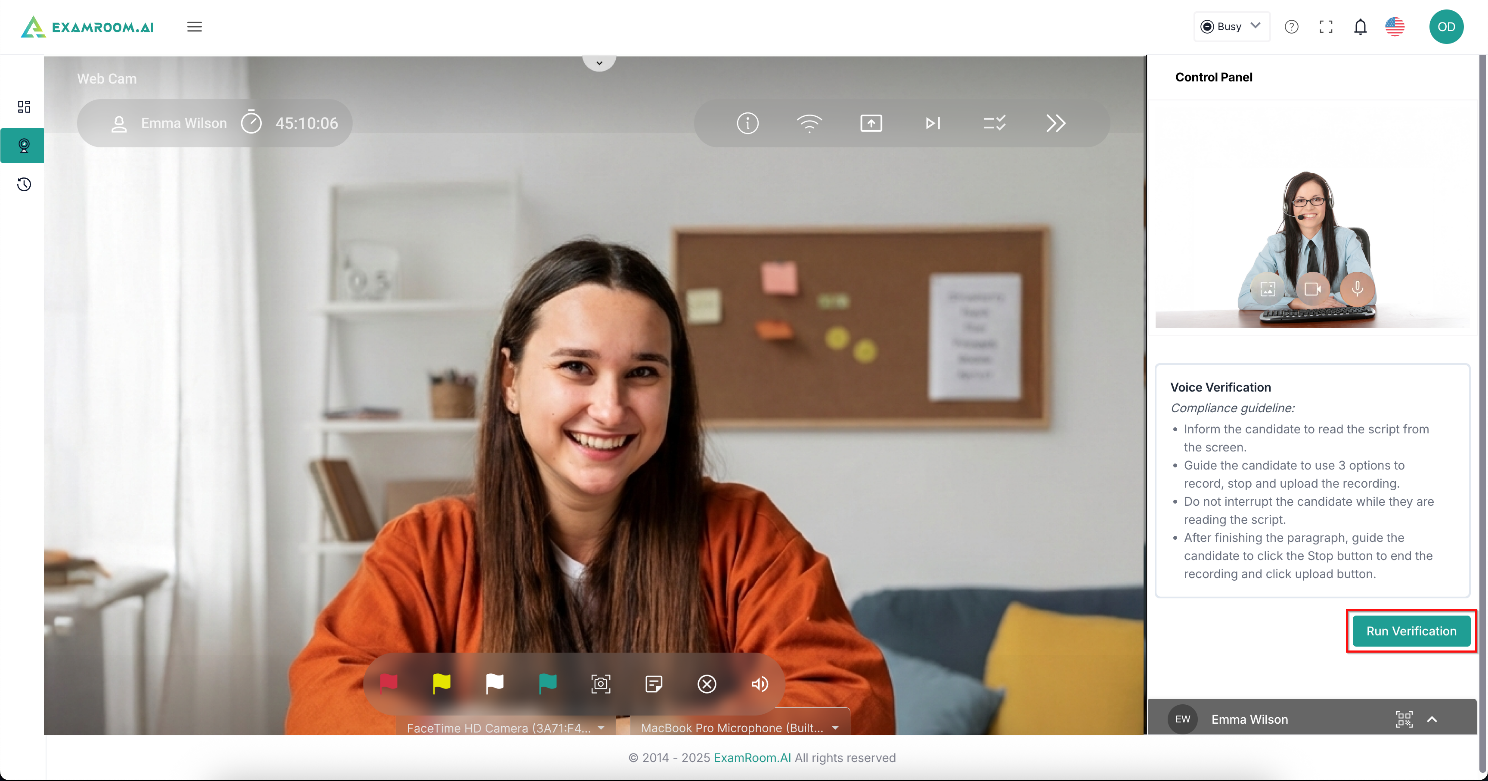
- Read the compliance guidelines and click Run Verification, available on the right-side panel, to start the voice verification process for the candidate.
- Wait for the candidate to provide privacy consent and then click Capture to verify the candidate’s voice and match it with the saved data. Click Retry to repeat the process.
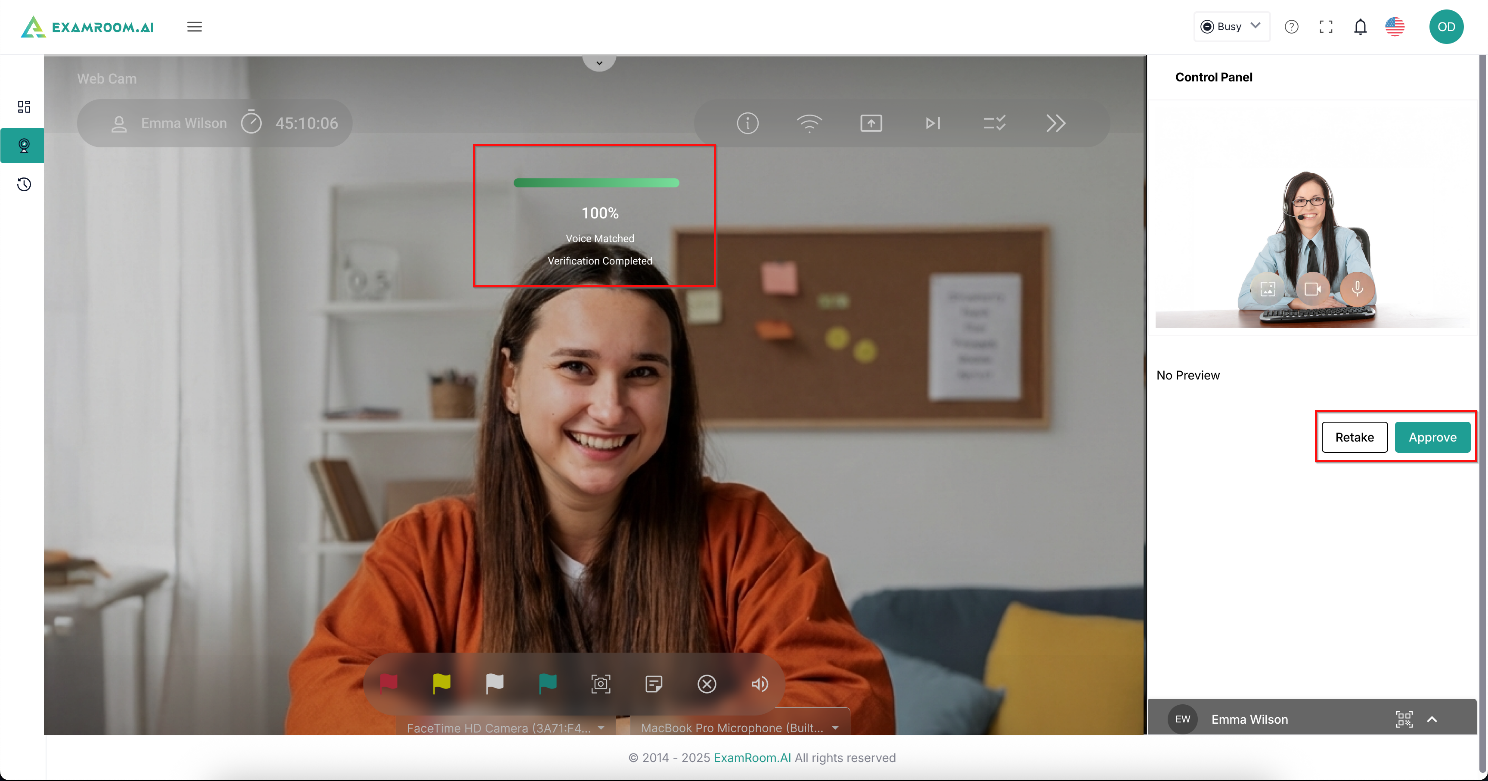
- Click Approve after the candidate’s voice is captured as per the compliance guidelines. If it does not match, click Retake and ask the candidate to repeat the process. The match percentage is also displayed on the screen.
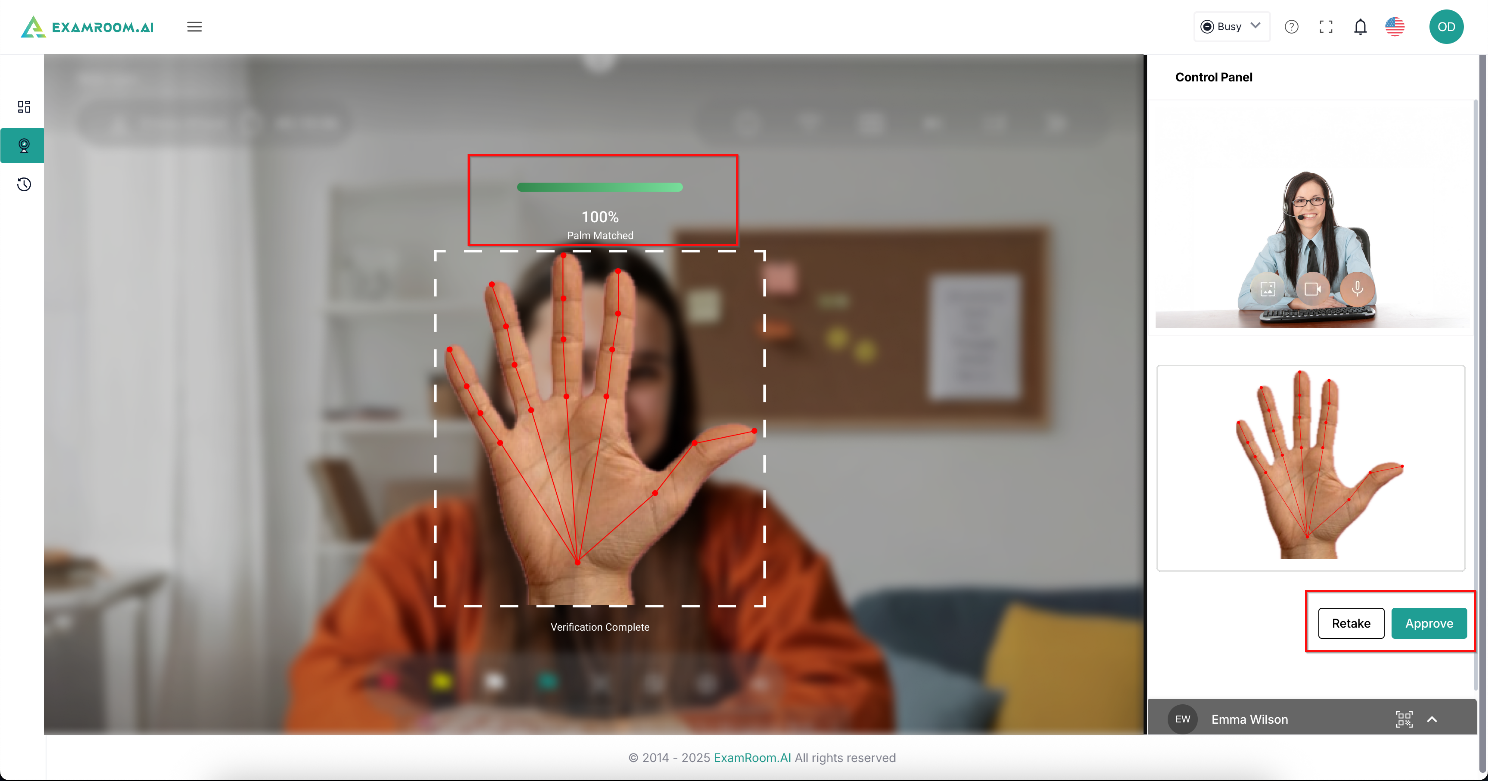
Palm Verification
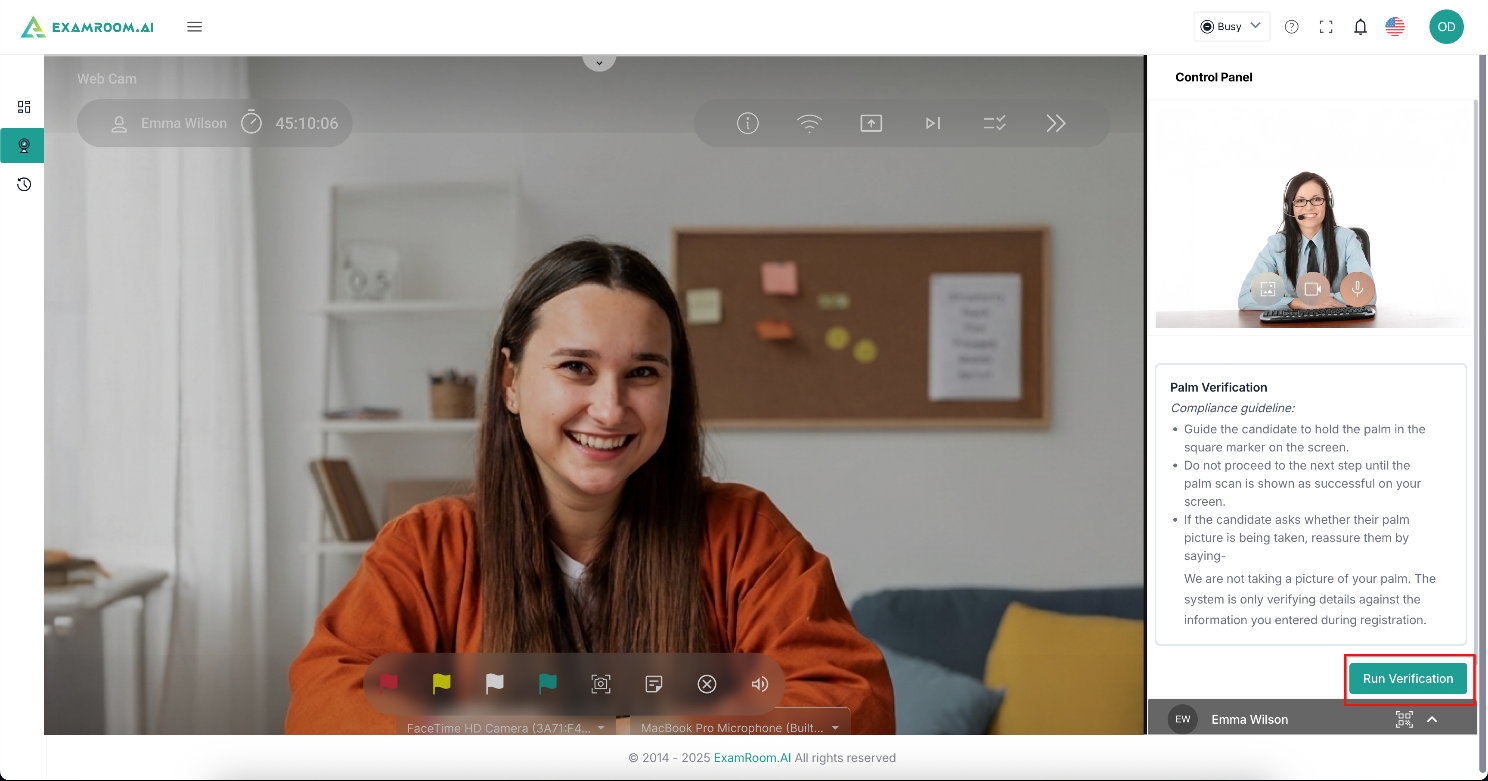
- Read the compliance guidelines and click Run Verification, available on the right-side panel, to start the Palm verification process for the candidate.
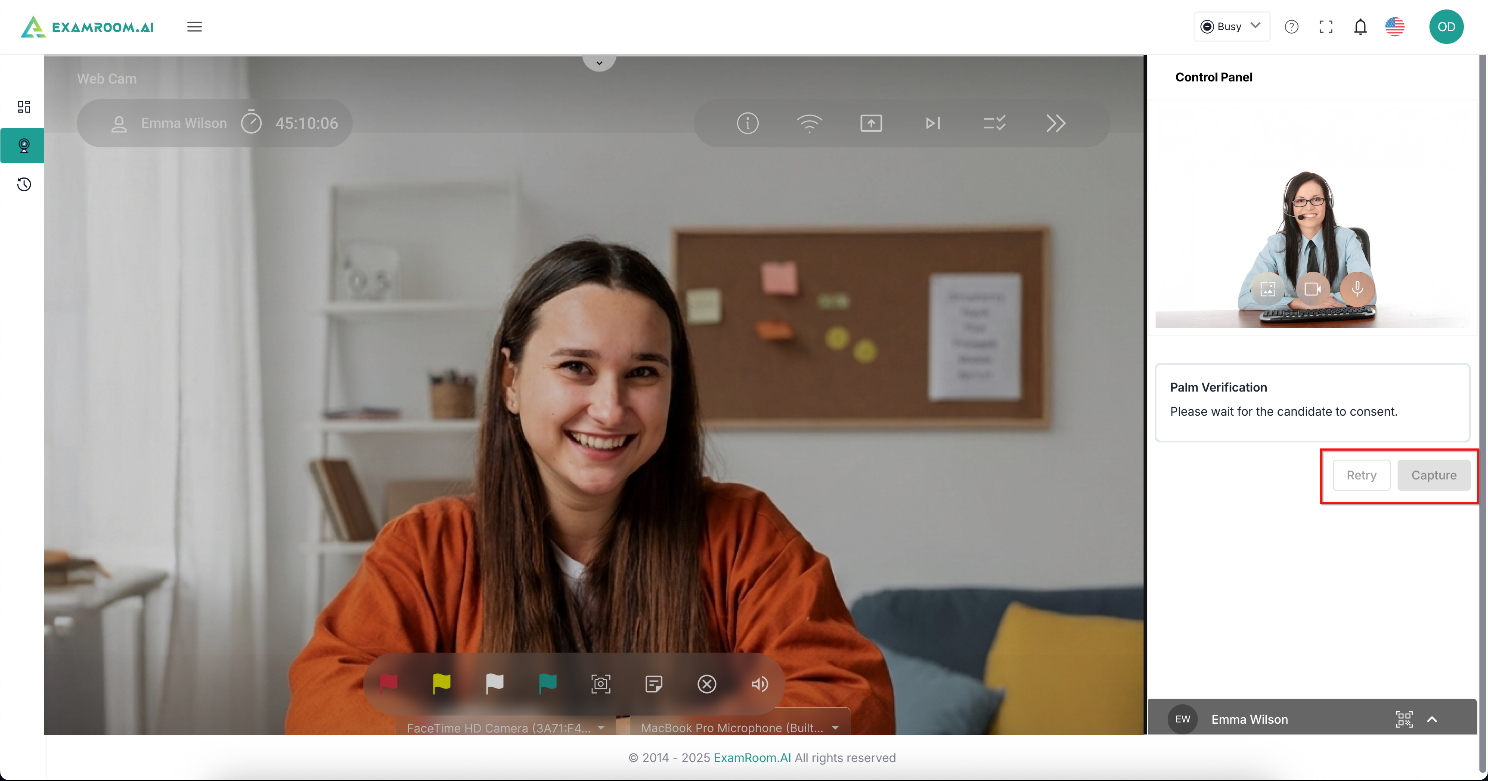
- Wait till the candidate provides privacy consent and then wait till it is auto captured by AI. If not, click Capture to verify the candidate’s palm and match it with the saved data. Click Retry to repeat the process.
- Click Approve after the candidate’s palm image is captured as per the compliance guidelines. If it does not match, click Retake and ask the candidate to repeat the process. The match percentage is also displayed on the screen.
Signature Verification
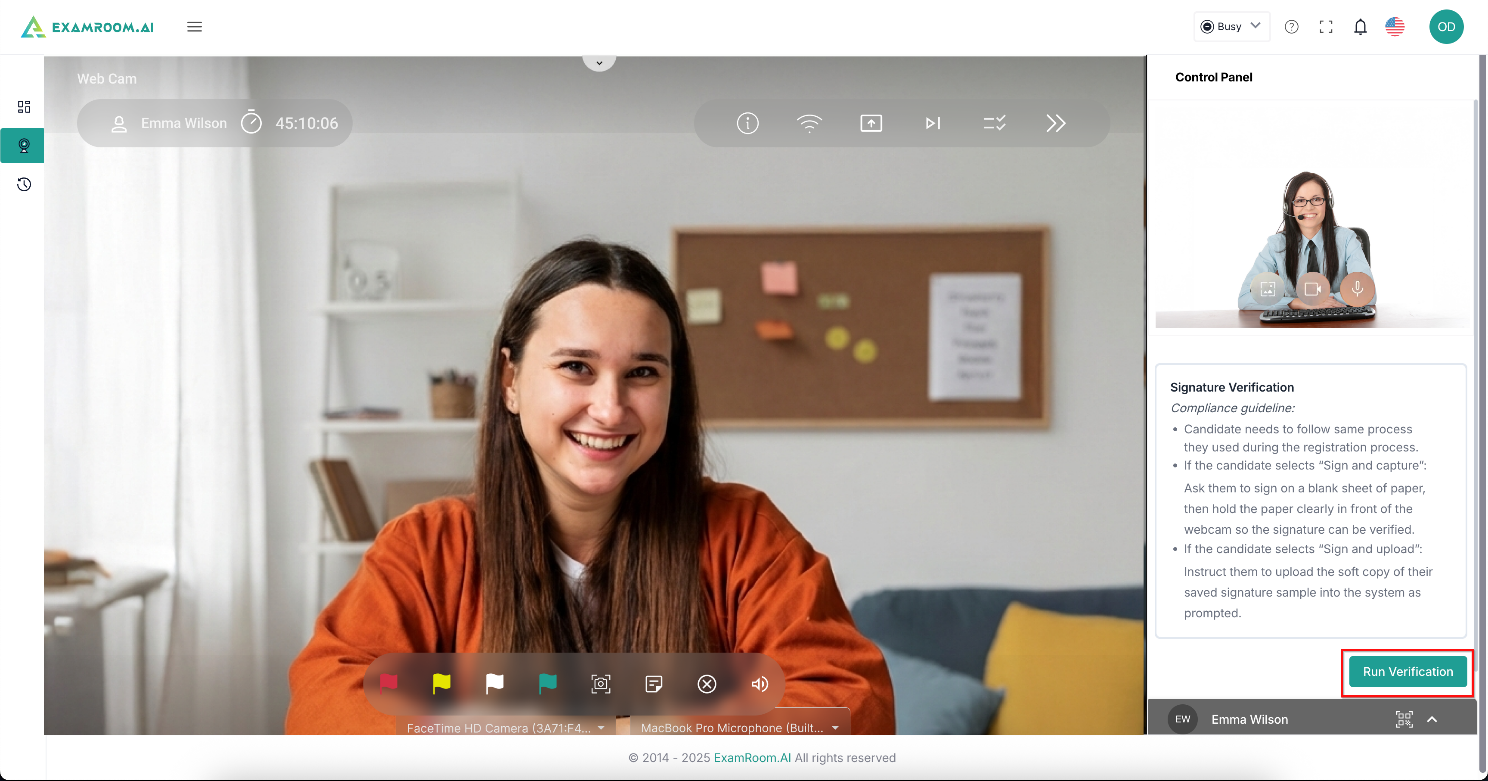
- Read the compliance guidelines and click Run Verification, available on the right-side panel, to start the signature verification process for the candidate.
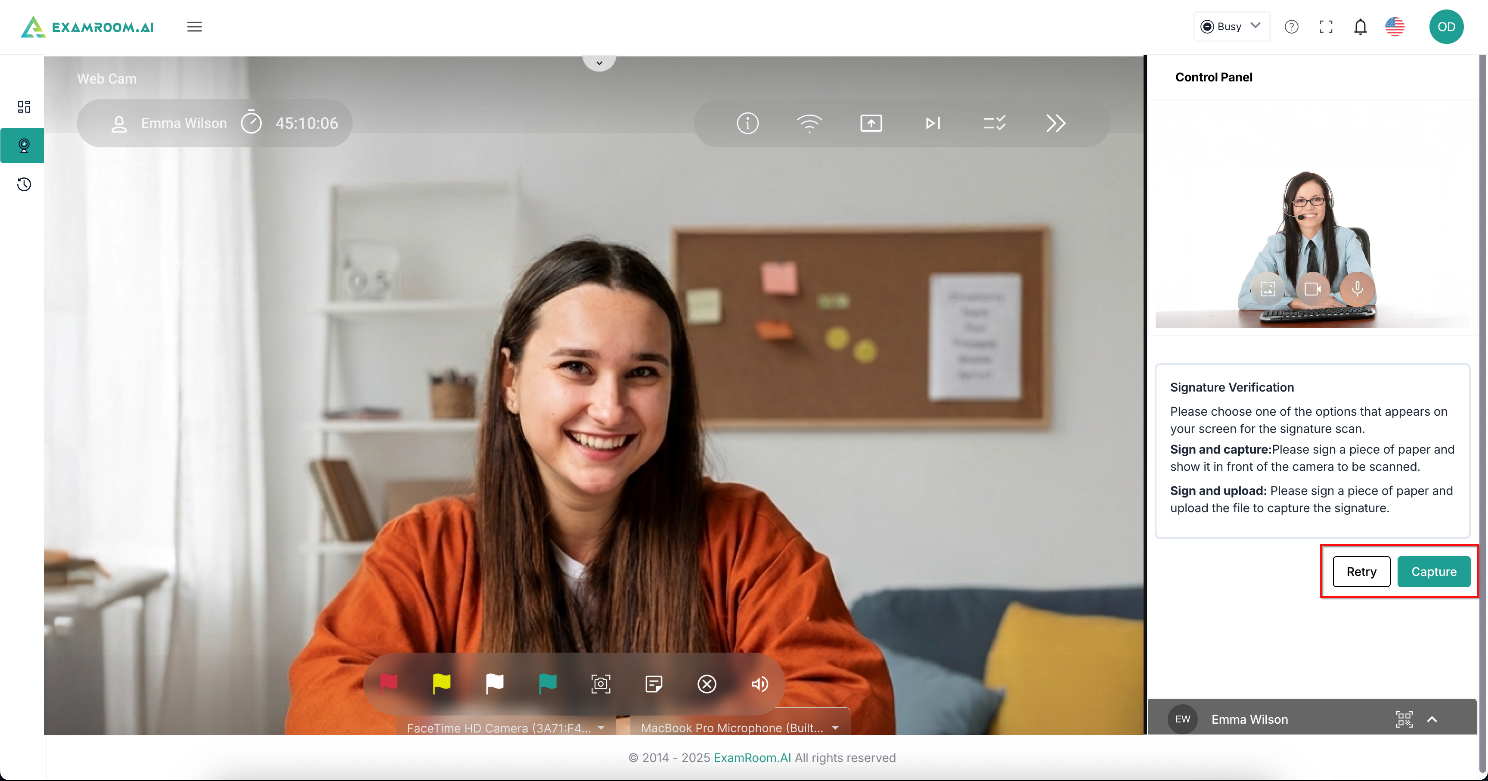
- Now, the candidate chooses any of the given methods for their signature verification:
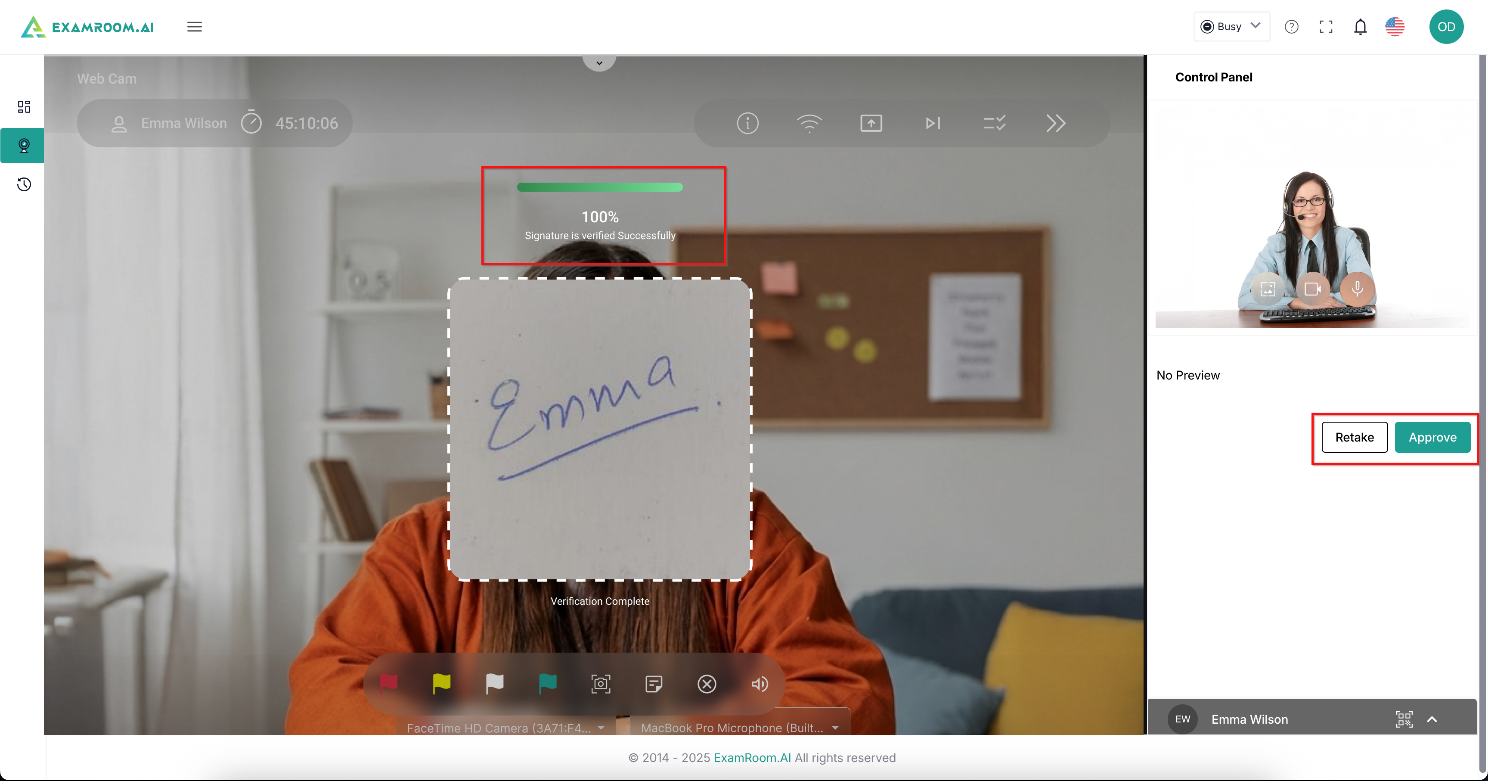
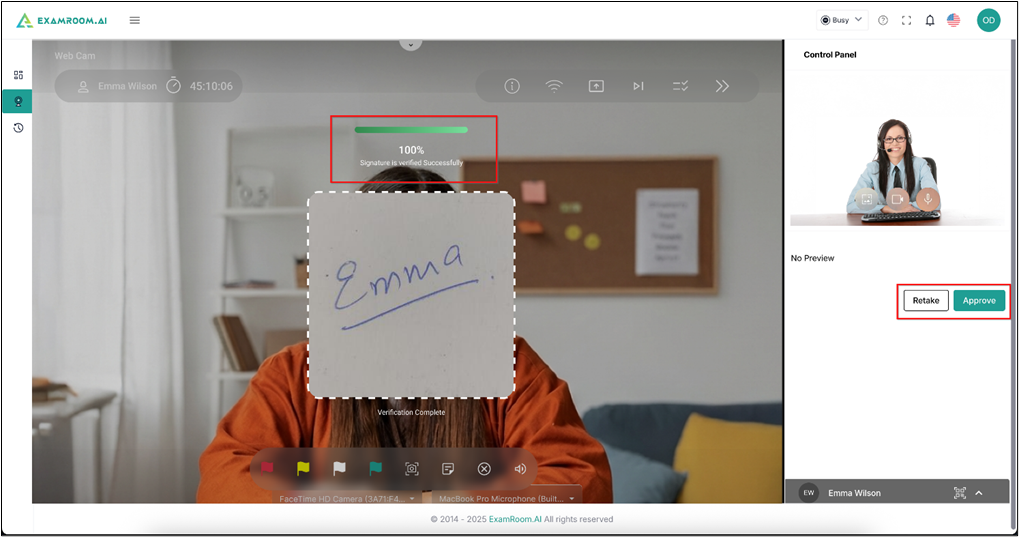
- 1st alternative: signing on a piece of paper and showing it towards the camera. Click Capture as the candidate shows it to the camera and verify the candidate’s signature, matching it with the saved data. Click Retry to repeat the process.
- Click Approve after the candidate’s signature image is captured as per the compliance guidelines. If it does not match, click Retake and ask the candidate to repeat the process. The match percentage is also displayed on the screen.
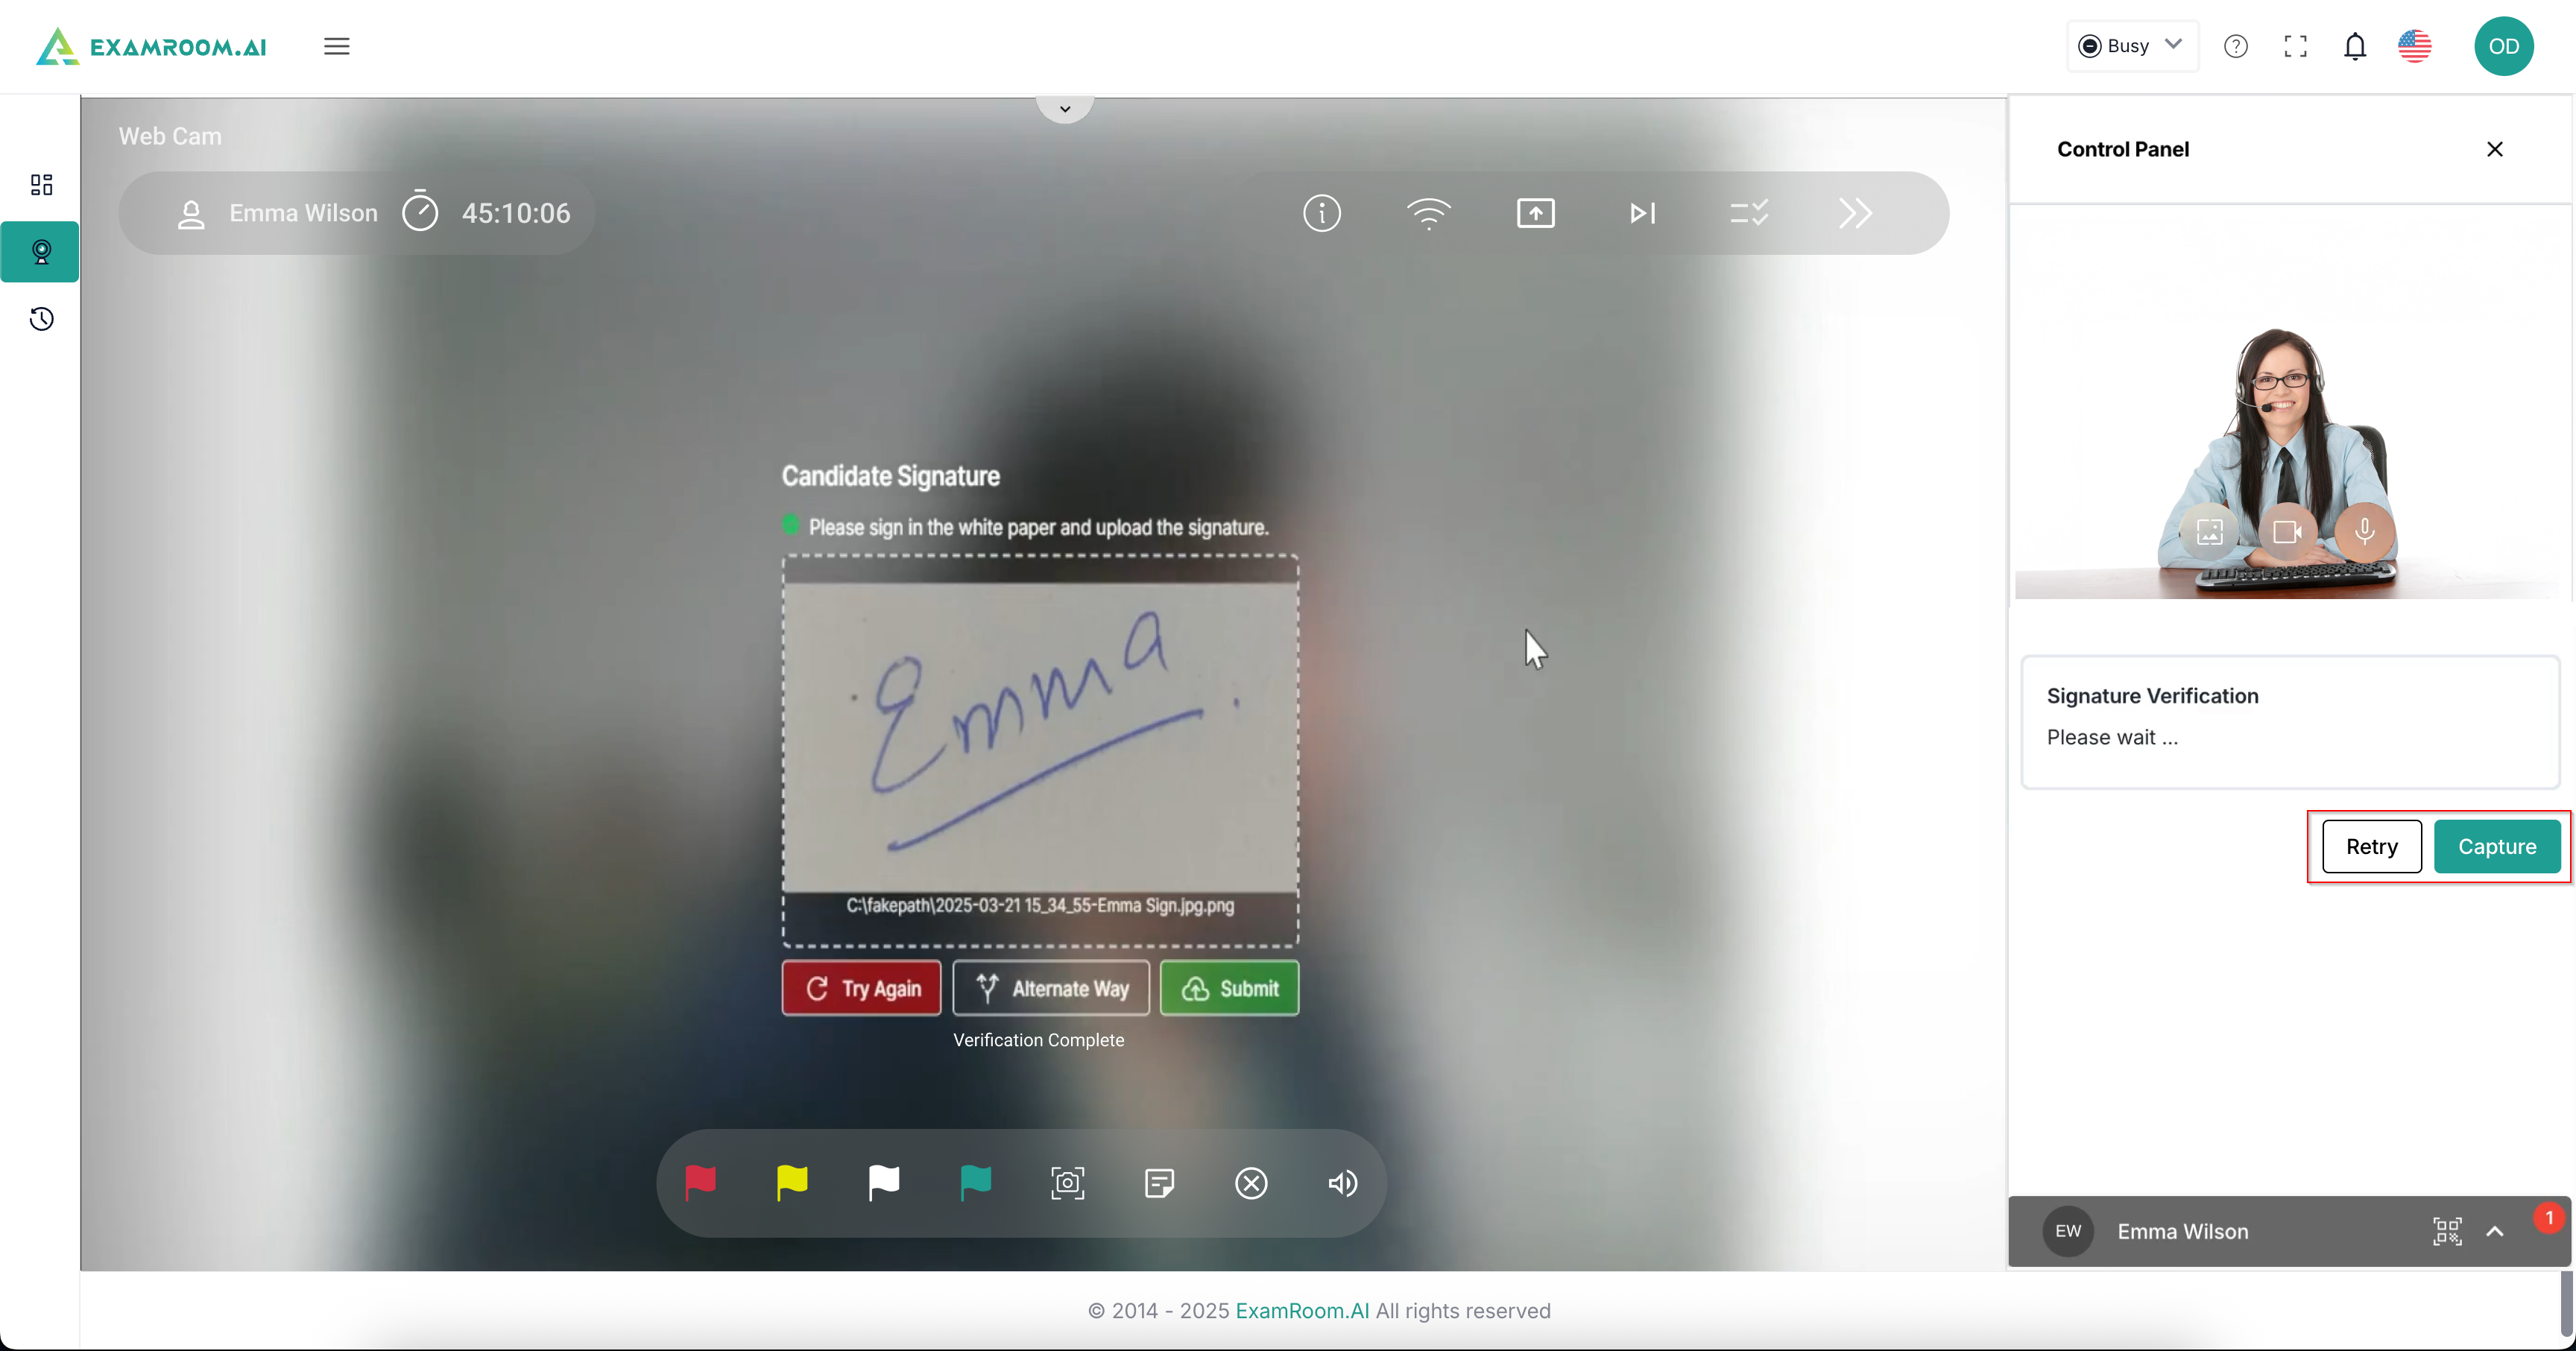
- 2nd alternative: Uploading a signature image from their local device. Click Capture to verify the candidate’s signature and match it with the saved data. Click Retry to repeat the process.
- Click Approve after the candidate’s signature is captured as per the compliance guidelines. If it does not match, click Retake and ask the candidate to repeat the process. The match percentage is also displayed on the screen.
- 1st alternative: signing on a piece of paper and showing it towards the camera. Click Capture as the candidate shows it to the camera and verify the candidate’s signature, matching it with the saved data. Click Retry to repeat the process.
Room Scan
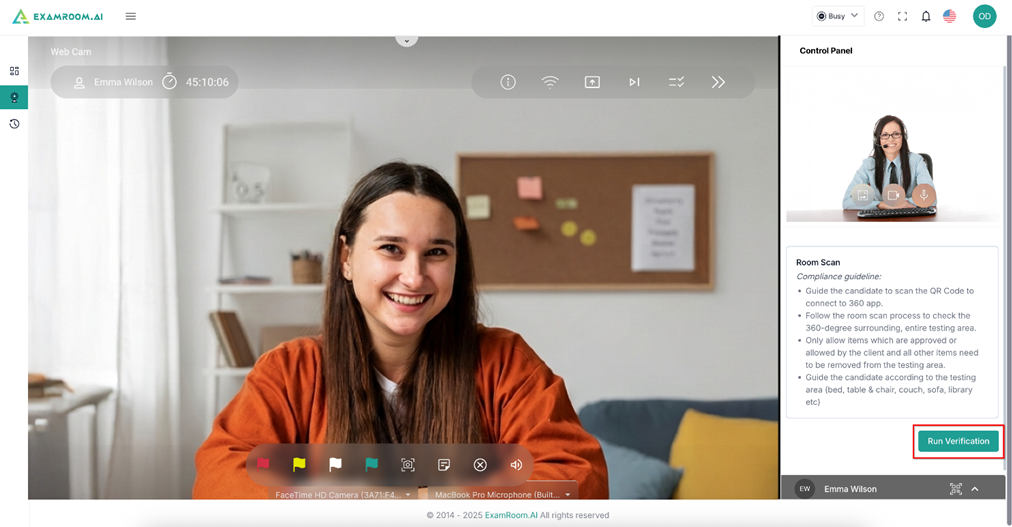
- Read the compliance guidelines and click Run Verification, available on the right-side panel, to start the room scan process.
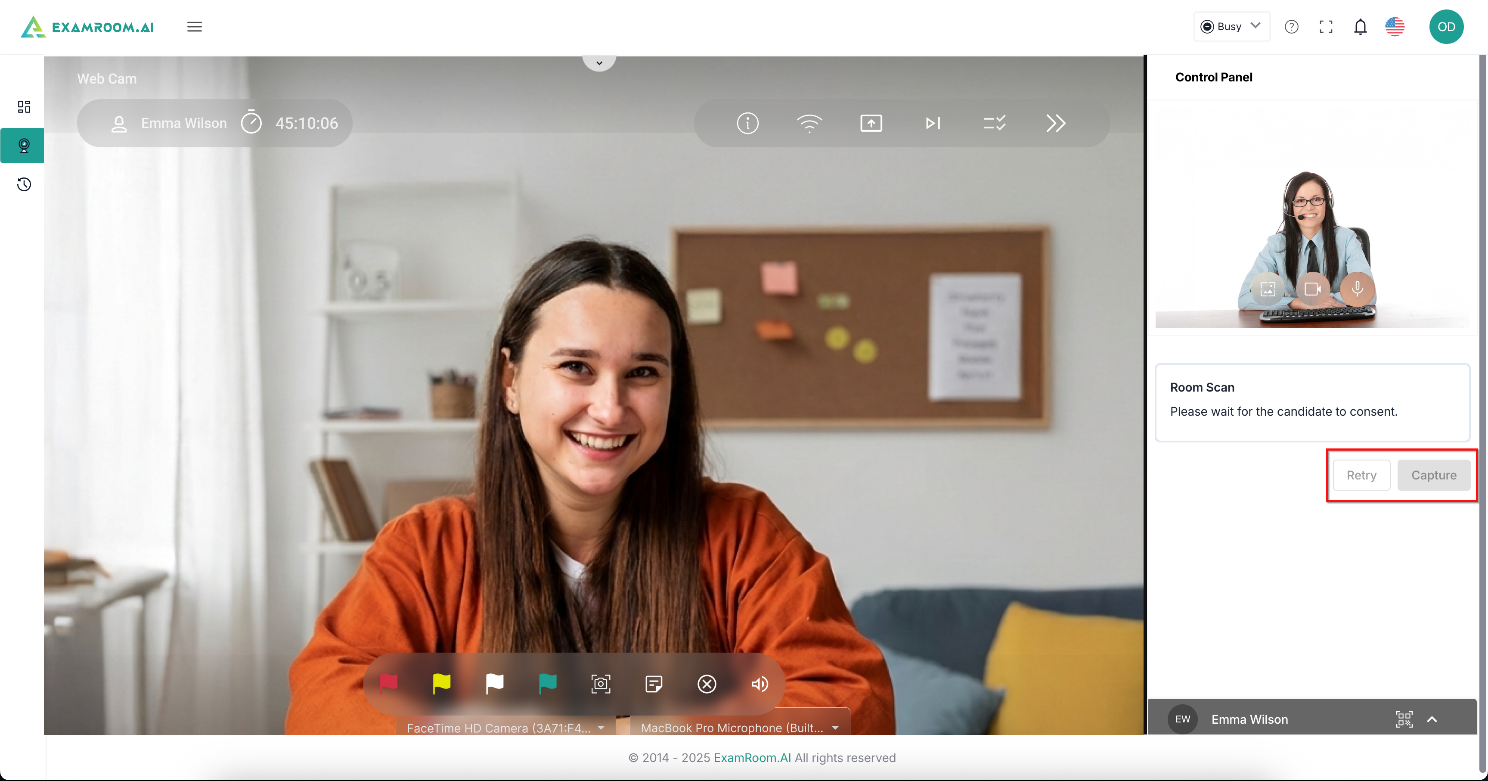
- Wait till the candidate provides privacy consent, and then click Capture to verify the candidate’s premises. Click Retry to repeat the process.
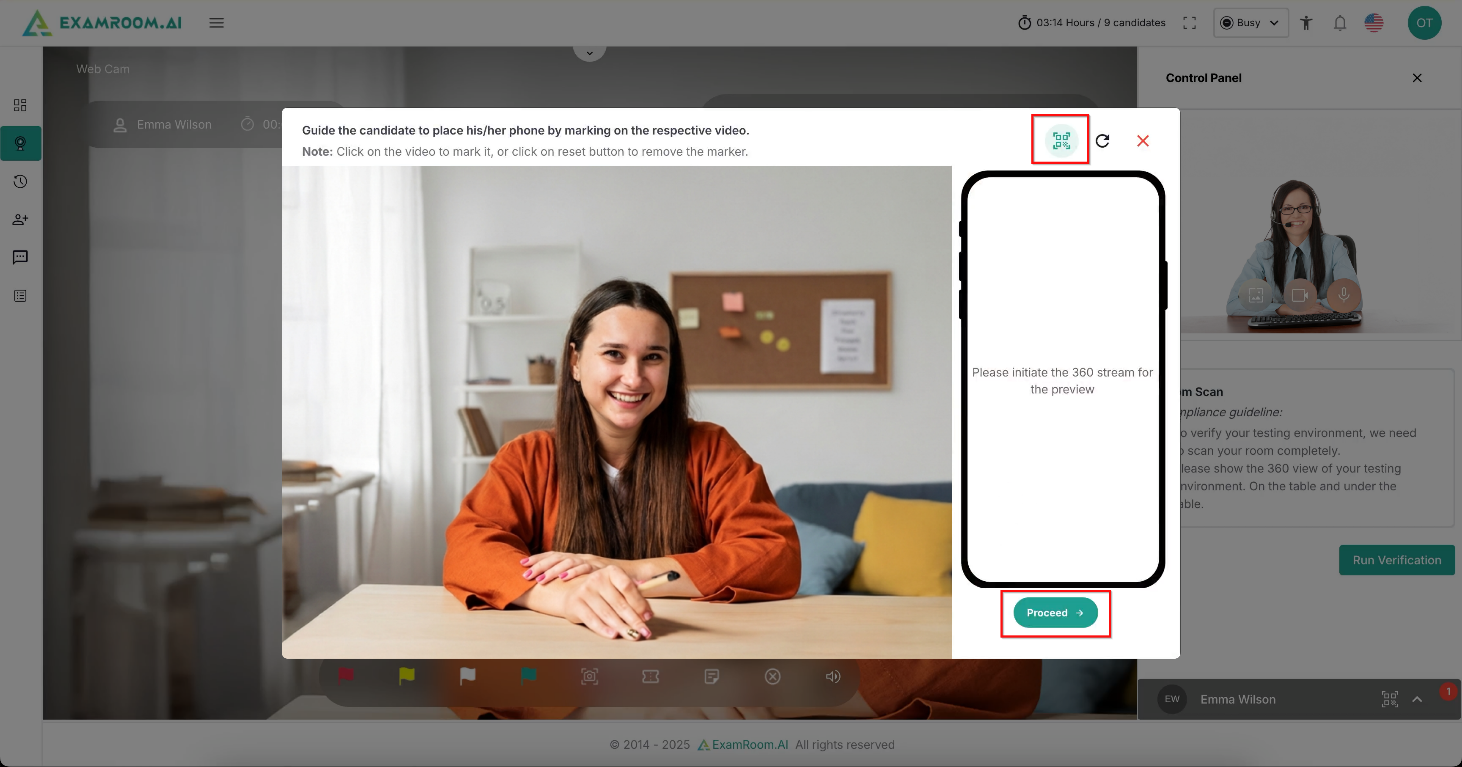
- Click the QR code icon to expose it to the candidate. Ask the candidate to scan to initiate the 360-stream using phone and then place their phone in the appropriate location for the side view. Click Proceed to go ahead.
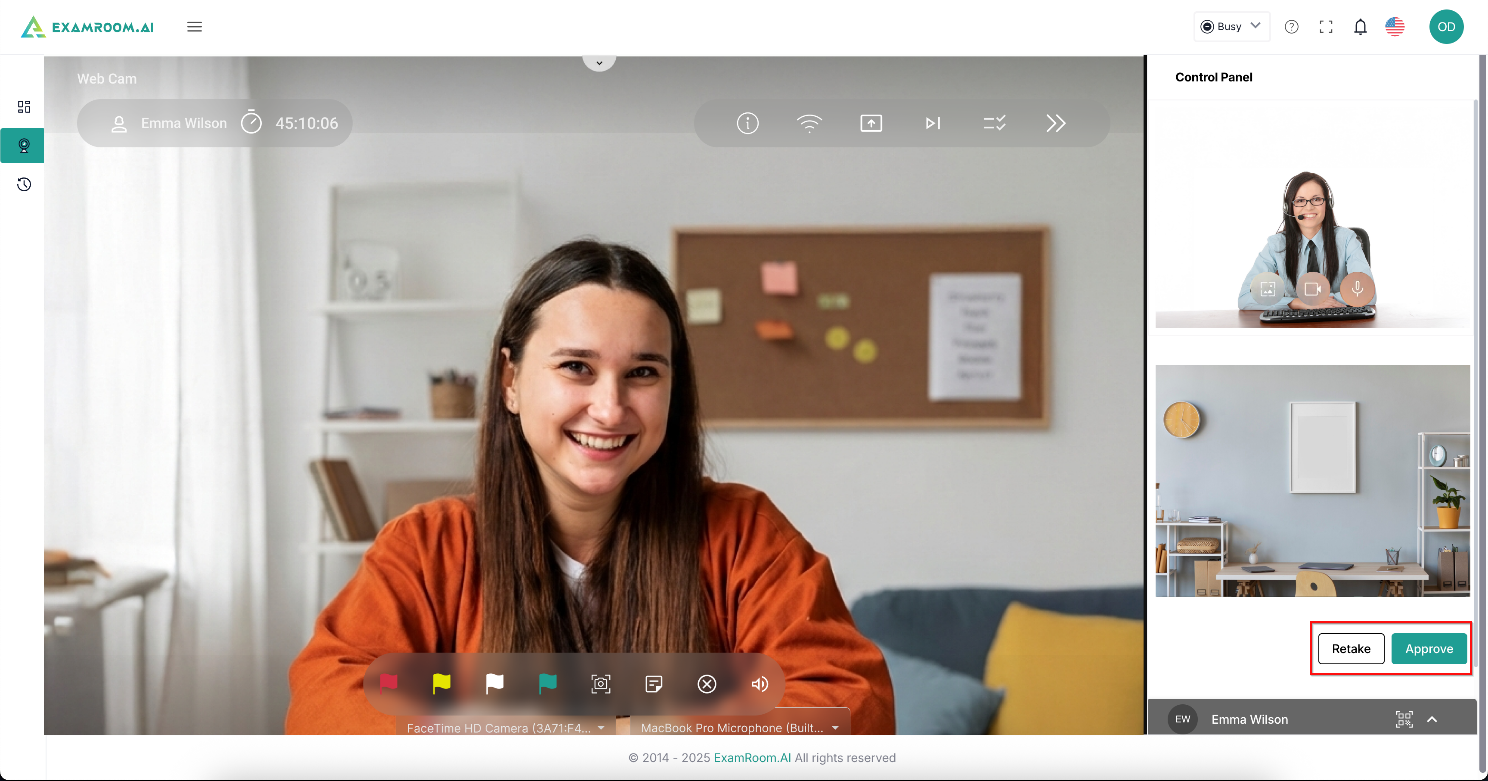
- Click Approve after the candidate’s room scan picture is captured as per the compliance guidelines. If it does not match, click Retake and ask the candidate to repeat the process.
Transfer to Proctor and End Onboarding Session
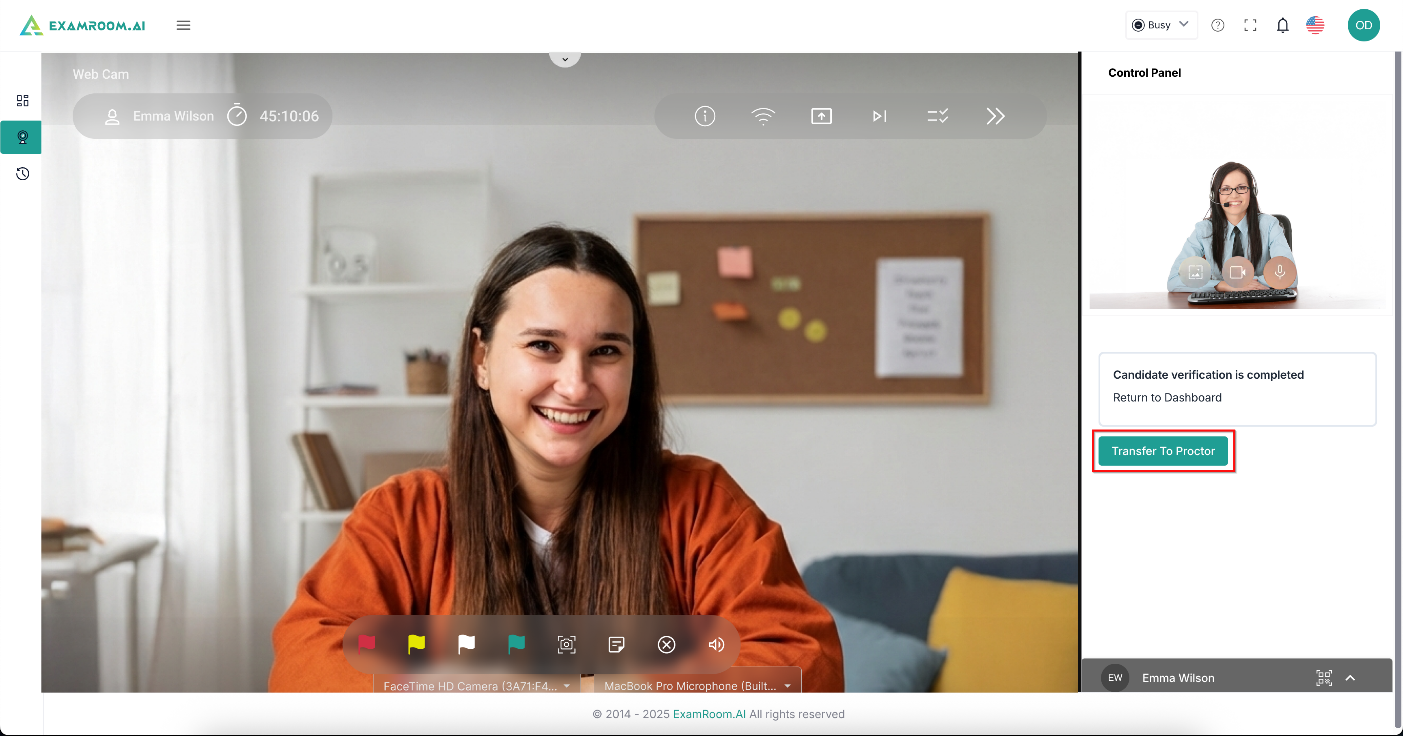
- Completion of the verification is notified by a message box on the control panel. Click Transfer to Proctor to transfer the candidate to Proctor.
- Once clicked, the option is greyed out, indicating the time until a proctor is assigned to the candidate and the proctor accepts the candidate.
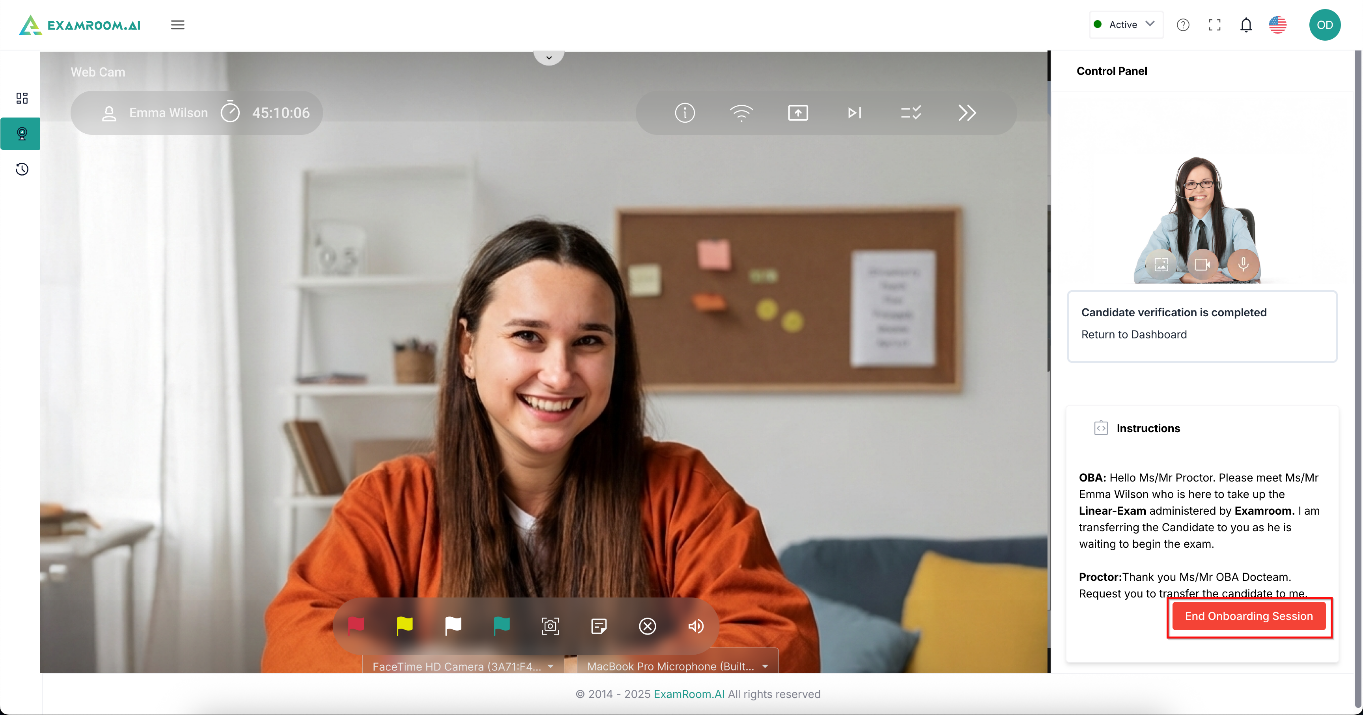
- Once the proctor joins, the right panel shows a message indicating the proctor has joined. The side panel displays the set of instructions, which also includes a basic introduction about the candidate and the proctor.
- Read the instructions and click End Onboarding Session to end the session.
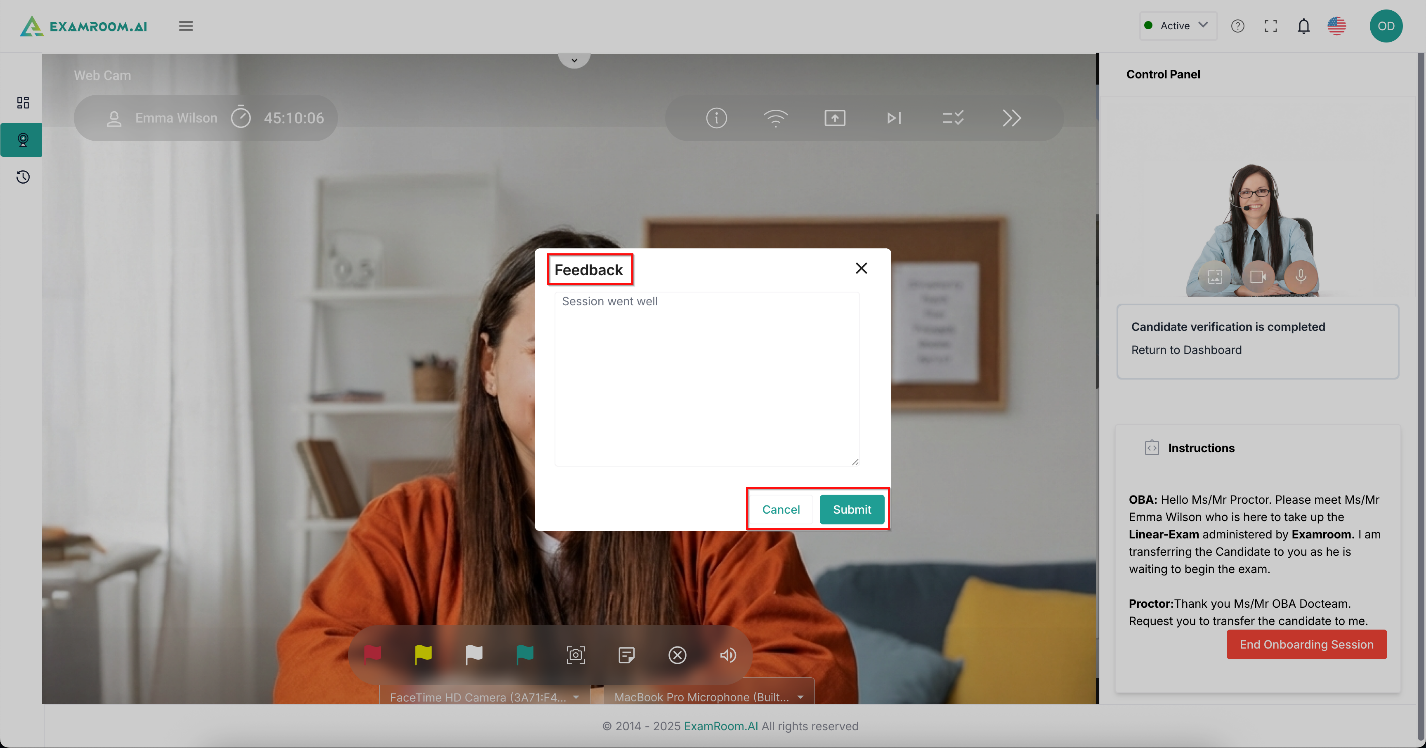
- A pop-up appears on the screen to write feedback. Write feedback and click Submit to save and submit the feedback. Click Cancel to go back to the end onboarding session screen.